PowerShell continues to be the most important tool in the arsenal of IT Pros worldwide, yet little has changed since we made the journey to the cloud. Even the release of PowerShell 7 didn’t bring much change – the remote connectivity method we use to manage Exchange Online objects still reigns, and so do all its well-known drawbacks.
Microsoft has been working to address these drawbacks and earlier this year we got the new “V2” module, featuring few REST-based cmdlets, which bring speed and reliability improvements and were subject on our recent webinar. Another front on which Microsoft is making advances is getting rid of basic authentication, more specifically addressing scenarios where you want to perform some tasks via a scheduled script or workflow that cannot be used with an interactive MFA challenge. Until now, your options for such scenarios were to either use basic authentication or ensure that someone will be available to handle the MFA request.
Now, Microsoft has released a preview version of the ExO V2 module that brings support for the so-called client credentials flow, allowing you to run tasks with the use of certificate-based authentication. In other words, we can now securely automate processes that involve running Exchange Online PowerShell cmdlets, without the need to resort to using basic authentication. Let’s see how this all works.
Prerequisites
First things first, make sure to download/install the latest version of the “V2” Exchange Online PowerShell module, namely 2.0.3. Since the module is distributed via the PowerShell gallery, installing it is easy:
Install-Module ExchangeOnlineManagement -RequiredVersion 2.0.3
Or if you already have a previous version of the module installed:
Update-Module ExchangeOnlineManagement -RequiredVersion 2.0.3
Now, if you check the available parameters for the Connect-ExchangeOnline cmdlet, you should see few newly introduced ones: –CertificateThumbprint, –CertificateFilePath and –CertificatePassword. As their names suggest, you will use those to provide the certificate needed for authentication. First however, we need to configure some things on Azure AD side.
Without going into too much details, here are few basic things you need to understand. In order to use any of the “modern” Microsoft cloud APIs, you need to authenticate first, and you do so by obtaining a token for a given application registered in Azure AD. If you plan to use the APIs as an end user, say for checking your mail, you will run into the so-called “delegate permissions” model, where you authenticate as a given user and the permissions you get are the intersection of the permissions granted to the application and those granted to your user. If you plan to use the APIs as a background task or a “daemon”, you will instead use the so-called “application permissions” model, where the permissions granted to the application determine what you can or cannot do. This second method is what we will use and to do so, we need to register the application object first.
Registering an Azure AD application and configuring permissions
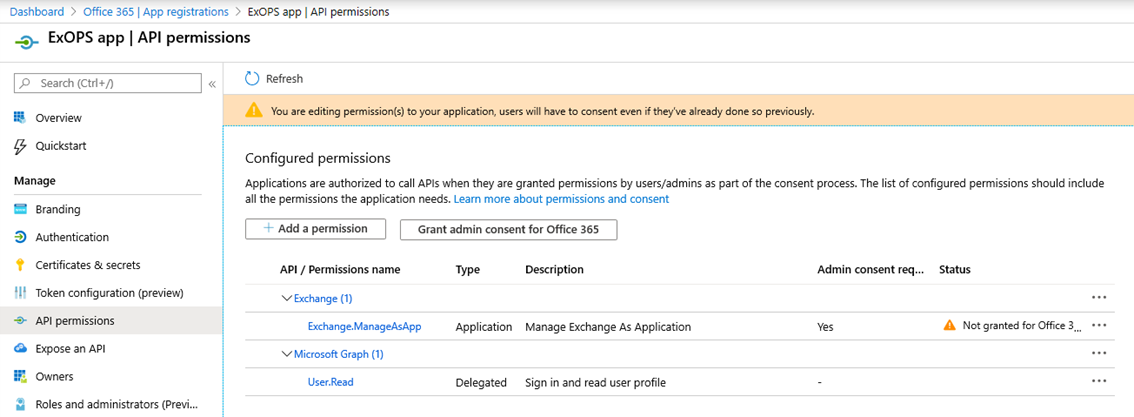
To register the application, open the Azure AD blade and navigate to App registrations on the left, then hit the New registration button. All you need to provide here is a Name for the application, leave the other settings unchanged. After creation, you will need to configure API permissions for the application, in other words specify what exactly the application can and cannot do within your tenant. To do so, click the API permissions entry on the left pane, then hit the Add a permission button. A wide set of available APIs will be presented, most notably the Graph API. However, there is currently no support for performing Exchange management operations via the Graph API, as some of you might be aware.
Instead, Microsoft is using a workaround of sorts. A new scope/permission has been introduced to the legacy Exchange REST API, which allows a given application to run PowerShell cmdlets to perform various management tasks in Exchange Online. This is the permission you need to add to our app, and to do so scroll to the bottom of the Request API permissions pane and click on Exchange under the Supported legacy APIs section. Next, click on Application permissions, expand the Exchange entry and select the Exchange.ManageAsApp permission. Hit the Add permissions button below to complete the operation.
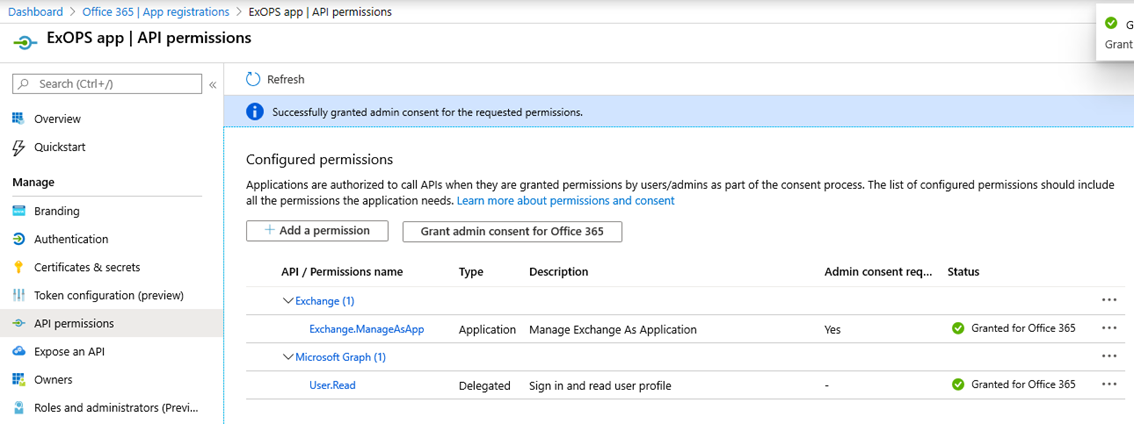
The above screenshot illustrates how the API permissions page will look like after you added the permissions. Another step is necessary at this point, namely consenting to permissions added to the application. You can perform this operation by clicking the Grant admin consent for (your tenant name) button, at which point the status should be changed as shown below:
Configuring authentication
So far, we have created an application object and granted it certain permissions in our directory. In order to be able to use said application however, we need to authenticate against Azure AD and obtain a token for it. When using the “application permissions” model, this is performed via client secret or a certificate. The former is basically a very long password string and is generally considered less secure than using a certificate. With that in mind, Microsoft has chosen to only support certificate authentication for establishing a new remote PowerShell session.
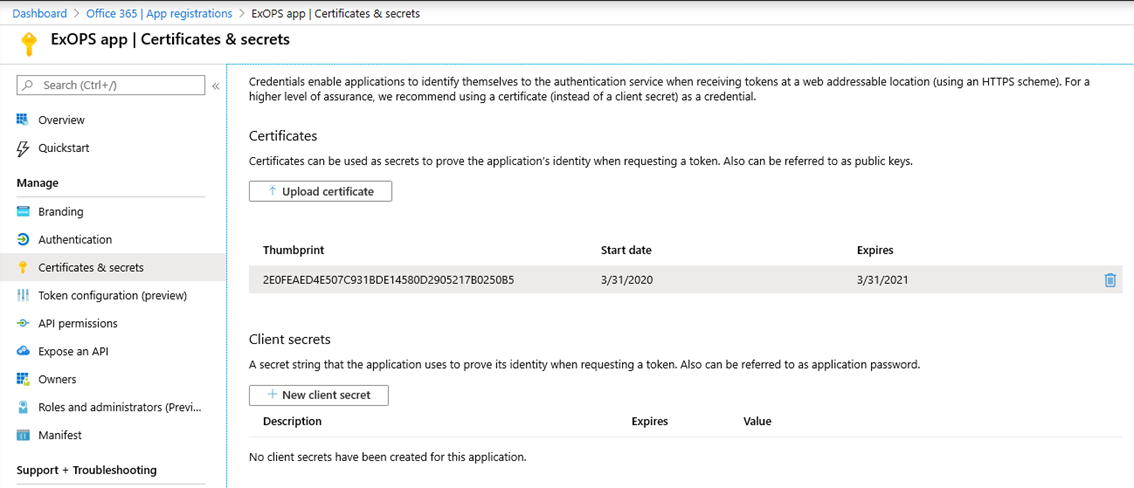
You can use a self-signed or publicly trusted certificate, basically any certificate would do as long as you have the private key for it (and it’s not created via the CNG API). Assuming you have the .cer file handy, open the newly created application’s settings and under Manage, click Certificates & secrets. Here, click the Upload certificate button and point to the certificate file. Other certificate file types (.crt or .pem) can also be used and you can configure multiple certificates if needed.
More permissions
But we’re not done yet. As mentioned above, the Graph API currently does not support any Exchange management operations, so we cannot use the API permissions model to specify what exactly our application will be able to do in Exchange Online. We also cannot use the robust Exchange RBAC model, as it only applies to user objects within the directory, and no such object exists for our application. What does exist is a “service principal” object, basically a representation of the application object, to which we can grant certain Azure AD roles. Which is basically another workaround employed by Microsoft to make all this work.
To grant a directory role to the service principal corresponding to our application, navigate to the Azure AD blade and then Roles and administrators. The role you select here will determine the set of permissions the application will be granted within Exchange Online, so accordingly you should select only roles that are present in Exchange Online. Currently, those include: Global admin, Exchange admin, Compliance admin, Security admin, Security reader, Helpdesk admin, Global reader*. Select the Exchange admin entry, click on the Add assignment button then enter the name or the ID of the application we created above and click the Add button.
Note that you cannot add those permissions via the Microsoft 365 Admin Center, as it doesn’t recognize service principal objects. Which also means that the corresponding entries will not be listed if you look at the members of a specific role in said portal, so have that in mind.
Connecting to Exchange Online
After going over all the steps detailed above, we are now finally ready to put things to the test. Which is as easy as running the Connect-ExchangeOnline cmdlet with the new parameters:
Connect-ExchangeOnline -CertificateThumbprint "8725BA5FB1CB62BB0E00487E9C07336EFCEFF7DC" -AppId " ae13ad05-9b02-4246-2906-78b7cc7d7f5f" -ShowBanner:$false -Organization tenant.onmicrosoft.com
In the example above, we are using the –CertificateThumbprint parameter to point to a certificate stored within the “personal” store of the current user. Alternatively, you can use the –CertificateFilePath parameter to point to a certificate file instead, combined with the –CertificatePassword parameter to provide a password (as secure string). Apart from the certificate details, few more bits of information are needed in order to obtain a token, namely the tenant identifier, specified via the –Organization parameter as the tenant.onmicrosoft.com domain, and the ID of the application we created above, specified via the –AppId parameter.
If everything goes as expected, the module will obtain a token from Azure AD, then use the “standard” way of passing it to Exchange Online in order to establish a remote PowerShell session and fetch the cmdlets to which the given app will have access, depending on the role assigned to it. There will be a slight difference with the number of cmdlets available, as we are no longer running things in a user context and functionalities such as role assignment policies will not apply.
Some additional info
Running cmdlets in a “service principal” context might have some additional implications though, as hinted above. Probably the most important one to mention here is the lack of RBAC controls – we are simply not able to take advantage of the robust and granular controls Exchange offers. Instead, what the service principal can and cannot do is determined by the role we assigned to it in the Azure AD portal, which in turn is “translated” into one of the “managed” role groups:
Get-RoleGroup | ? {$_.Capabilities -eq "Partner_Managed"}
While you can certainly play with the roles and actions assigned to said role groups, any changes you make will affect all other members, such as your Global administrators for example, and you cannot target an RBAC role or assignment to just the service principal object.
Another, albeit minor consequence of not running into a user context is that some cmdlets will fail to return when run in a manner you might be used to with “regular” PowerShell. For example, if you run Get-Inbox rule without any parameters, you will usually see the list of rules for your own mailbox. But since you are now not running cmdlets as a user, the output will be empty, and instead you need to make sure to specify the –Mailbox parameter:
That’s likely not going to be a problem if you are diligently using the “proper” syntax with your scripts, but if you are lazy like me and used to taking shortcuts, it’s something to be aware of.
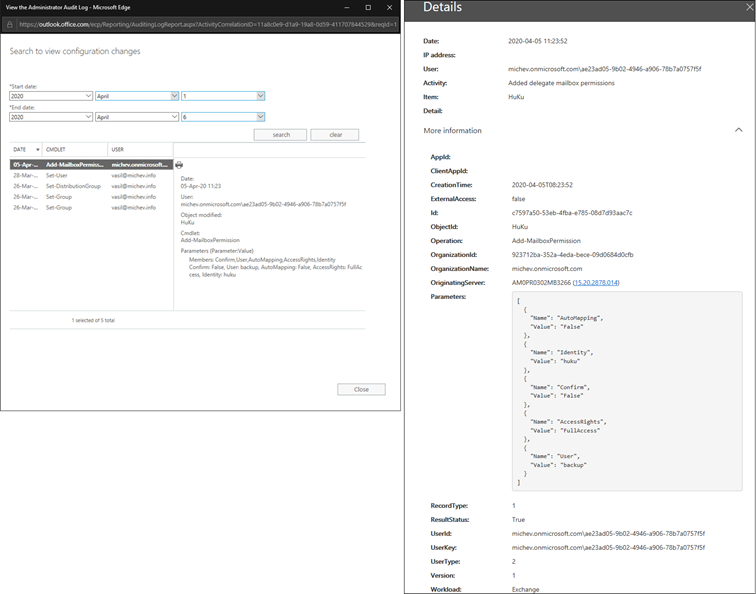
Switching gears a bit, you will be delighted to know that the running the cmdlets via this new method still results in them being diligently captured in the Admin audit log, which in turn flows into the Unified Audit log in Office 365. This is illustrated on the screenshot below, where the left side represents the event captured in Exchange’s admin audit log, and the right side gives you the details of the same event as seen in the Unified audit log:
The interesting bit here is of course the identify of the user that run the cmdlet, which is presented in the tenant.onmicrosoft.com/app_client_ID format.
Turning to other security/compliance controls, we should mention few important bits. First, as some of you are probably aware, authenticating via the so-called “client credentials” flow against Azure AD is NOT a subject to conditional access policies and MFA enforcement. While this might be a good thing to some extent, as it allows us to enable automation, you should take care to secure your credentials as anyone that gets his hand on them can reuse them. This is the main reason why using certificate credentials is recommended over using the client secret method (which does work with the Exchange Online cmdlets!), and you should make sure to protect your private key.
In addition, logins associated with the client credentials flow are NOT being currently captured in the Azure AD audit logs, which further emphasizes the importance of protecting the credentials and limiting the permissions granted to the application. Speaking of limiting access, some of you might remember the application access policies that were introduced a while back in Exchange Online. Sadly, those only apply against actions performed via the Graph API endpoints, and cannot be used to restrict the permissions for this scenario.
Summary
In this article, we introduced the new, certificate-based authentication for ExO PowerShell. Using the new method “feels” much the same, as almost all cmdlets are available and behave in a similar fashion to what you are used to. Microsoft has spent a great deal of effort and introduced quite few workarounds to make this possible. You will even get some of the goodness introduced with the V2 module, such as access to the REST-based cmdlets and better session reconnectability.
The module still proxies authentication via the WinRM basic endpoint though, which might be a problem for some organizations. It also lacks support for the SCC cmdlets currently and some of the robustness of the RBAC model. Still, it should enable quite a few automation scenarios, in a more secure manner. To learn more about it and see it in action, make sure to sign up for our upcoming webinar or check the official documentation.


8 thoughts on “Certificate-based authentication for Exchange Online Remote PowerShell”