Microsoft has steadily been adding Graph API endpoints to cover eDiscovery scenarios, albeit only targeting the “Premium” experience. Just recently, the Export operation become available, bringing full coverage for (Premium) eDiscovery operations. Among other things, eDiscovery export is still being leveraged as one of the few ways to get data out of the service, so let’s take a look at the corresponding Graph API endpoints and methods.
As with most things Graph, the first question to address is permissions. The eDiscovery endpoints only support delegate permissions currently, with support for application permissions scenarios coming in the future. In terms of scopes, we have only two: the read-only eDiscovery.Read.All, as well as the eDiscovery.ReadWrite.All “full access” scope. As with other delegate permission scenarios, you need to also make sure that the user under which you’re running the queries has the necessary permissions granted within the Compliance portal.
To test the Export functionality itself, you will also need to have at least one eDiscovery Premium case available. While all the operations required in creating and configuring such can be performed via the Graph API, they are outside of the scope of the current article. Follow the standard guidelines to create the case, add custodians and other data sources, manage collections and holds, and so on, using either the UI or the Graph API. At least one review set will be required to test the Export functionality.
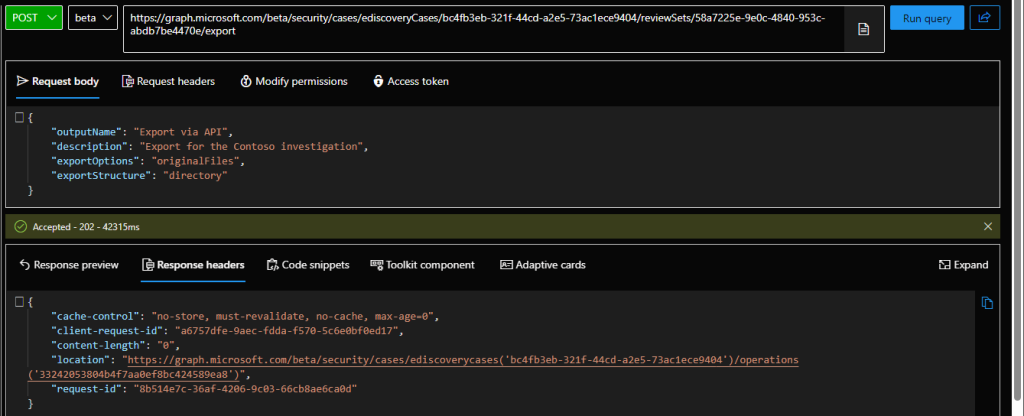
To start with the Graph API approach, one would probably first LIST all available eDiscovery cases, by means of using the /security/cases/ediscoveryCases endpoint. Grab the id of the case(s) you are interested in, then fetch the data on any available reviewSets therein (the /security/cases/ediscoveryCases/{caseId}/reviewSets endpoint). Once you have the id of the review set, we can perform the Export Operation by means of submitting a POST request against the /security/cases/ediscoveryCases/{caseId}/reviewSets/{setId}/export endpoint. The payload of the POST request contains the export operation properties, as detailed in the official documentation.
GET https://graph.microsoft.com/v1.0/security/cases/ediscoveryCases
GET https://graph.microsoft.com/v1.0/security/cases/ediscoveryCases/bc4fb3eb-321f-44cd-a2e5-73ac1ece9404/reviewSets
{
    "outputName": "Export via API",
    "description": "Export for the Contoso investigation",
    "exportOptions": "originalFiles",
    "exportStructure": "directory"
}
POST https://graph.microsoft.com/beta/security/cases/ediscoveryCases/bc4fb3eb-321f-44cd-a2e5-73ac1ece9404/reviewSets/58a7225e-9e0c-4840-953c-abdb7be4470e/export

As you might expect, the operation will run asynchronously, so the only thing you’re getting at this point is the id of the corresponding operation. Interestingly, the id is not returned as output, but listed as part of the Location header, as shown on the screenshot above. Other than that, expect an empty response with status of 202.
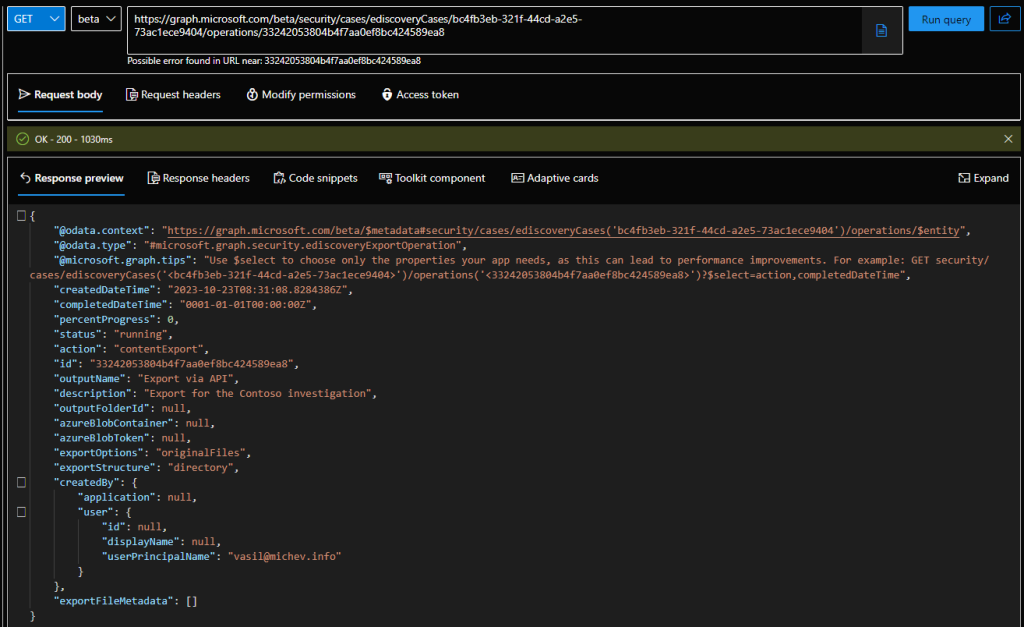
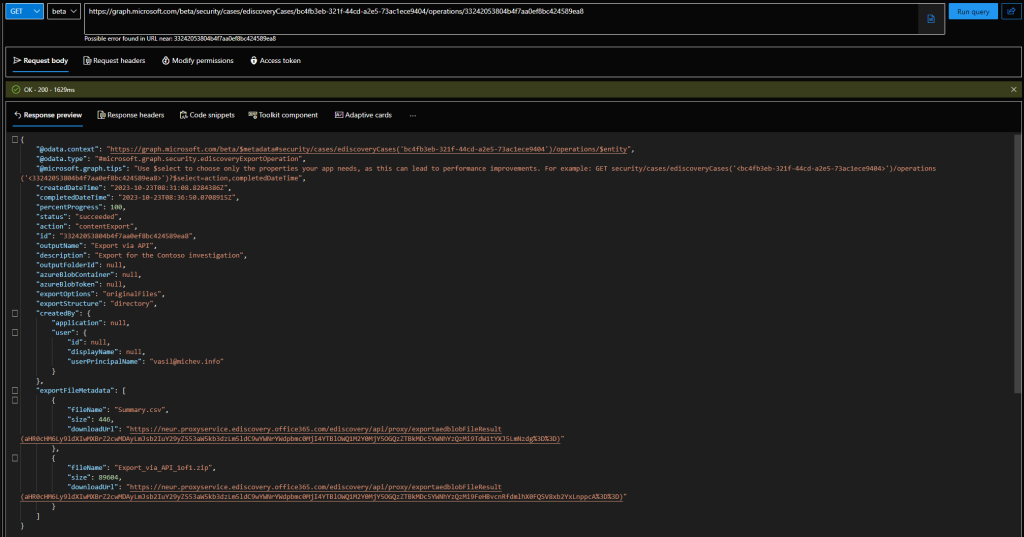
With the id at hand, we can fetch details about Export operation and its progress, by issuing a GET request against the /security/cases/ediscoveryCases/{caseId}/operations/{operationId} endpoint. As it might take a while for the operation to complete, expect running few of these – besides all Microsoft’s claims, the process is still quite slow, even when exporting a whooping total of one file. Anyway, the first screenshot below shows the Export operation in progress, whereas the second one reveals the details once the operation is complete.
GET https://graph.microsoft.com/beta/security/cases/ediscoveryCases/bc4fb3eb-321f-44cd-a2e5-73ac1ece9404/operations/33242053804b4f7aa0ef8bc424589ea8
Once the Export operation reaches status of “succeeded”, you can grab the exportFileMetadata property, which exposes direct download links for both the Export summary report, and the actual data to be exported. In our scenario above, this would be a single zip file, as per the format we specified. The maximum size for a single zip file is 75GB, at which point you can expect additional entries to appear under exportFileMetadata. As for the export format itself, other supported values include none, and pst.
And that’s how the process works, in a nutshell. Being able to create the export operation via the Graph API and then get the direct download URLs will surely be appreciated by some folks, as it allows to fully automate the process and gets rid of any dependencies on the eDiscovery export tool and/or Azure storage blobs. Rest assured, the download links are still permissioned and are not exposed to the general public, and you still need to handle authentication if you want a fully automated solution.
Few minor things to note before closing the article. First, the documentation currently claims that the read-only scope (eDiscovery.Read.All) should be sufficient for the Export operation, whereas my tests show that you need the eDiscovery.ReadWrite.All one for it to work. Another thing I’ve noted is that the Export operation does not seem to generate the “informational” alert you might be accustomed with (“eDiscovery search started or exported“). This however applies to Premium eDiscovery Exports as a whole, not just to the Graph API method. Still, it’s unfortunate oversight on Microsoft’s part. Lastly, the option to export to an Azure blob storage is not available via the Graph API (deprecated, according to the documentation).
For additional information about the feature and the various other options you can configure for the Export operation, make sure to review the official documentation.
UPDATE: Due to popular demand, here’s how to automate the download of the exported file(s). The important thing here is to have a valid access token, which you can then present to the proxy service in order to download the files. The token must be for the b26e684c-5068-4120-a679-64a5d2c909d9 resource (MicrosoftPurviewEDiscovery) and must contain the eDiscovery.Download.Read scope. And yes, admin consent is required for said scope.
Start by making sure the MicrosoftPurviewEDiscovery app is available/enabled within the tenant. You can search for it under the Enterprise apps page in the Azure AD/Entra portal, or you can check via PowerShell:
Get-MgServicePrincipal -Filter {appId eq 'b26e684c-5068-4120-a679-64a5d2c909d9'}
If no entries are returned, make sure to provision the service principal object:
New-MgServicePrincipal -AppId b26e684c-5068-4120-a679-64a5d2c909d9 -DisplayName "Microsoft Purview eDiscovery"
Now that we have the proper resource available, we need to get a token for it. As we do not know the redirectURIs (and auth methods supported) by the built-in app, we can use our own app registration instead. You can either create a fresh new app or use any existing app registration. In either case, you need to ensure that the b26e684c-5068-4120-a679-64a5d2c909d9 resource has been added to it, with the (only available) eDiscovery.Download.Read scope. Two ways you can enable this. The “easy” one is to open the Api permissions page, then hit the Add a permission button. Therein, select the APIs my organization uses tab, then search for and select b26e684c-5068-4120-a679-64a5d2c909d9. This here is the reason why we registered the SP above.
Once you select the b26e684c-5068-4120-a679-64a5d2c909d9 resource, you can add the only available scope therein,
 "requiredResourceAccess": [
{
"resourceAppId": "b26e684c-5068-4120-a679-64a5d2c909d9",
"resourceAccess": [
{
"id": "c78f9c7e-bb5c-4125-b69a-5594d2f4ffc2",
"type": "Scope"
}
]
Either way, you should end up with an app registration that has been granted permissions to issue tokens for said resource. This is how the end result should look like:
The next step is to actually get the token. You can do so via any of the ADAL/MSAL methos available, for example:
#Obtain access token for the b26e684c-5068-4120-a679-64a5d2c909d9 resource via MSAL
Add-Type -Path "C:\Program Files\WindowsPowerShell\Modules\MSAL\Microsoft.Identity.Client.dll"

$app = [Microsoft.Identity.Client.PublicClientApplicationBuilder]::Create("xxxxxxxx-xxxx-xxxx-xxxx-xxxxxxxxxxxx").WithRedirectUri("https://ExoPSapp2")
$app2 = $app.Build()

$Scopes = New-Object System.Collections.Generic.List[string]
$Scope = "b26e684c-5068-4120-a679-64a5d2c909d9/.default"
$Scopes.Add($Scope)

$token = $app2.AcquireTokenInteractive($Scopes).WithLoginHint("user@domain.com").ExecuteAsync().Result
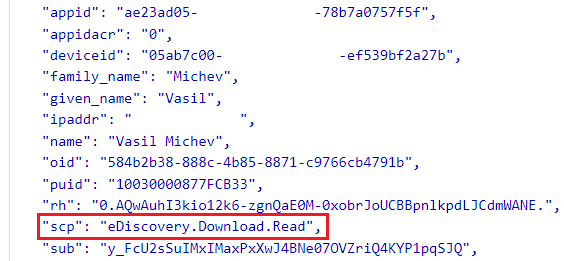
The important thing is to ensure that the token contains the eDiscovery.Download.Read scope, as shown below:
 With the token at hand, all we need to do is issue an Invoke-WebRequest and download the file(s). Here’s how:
$authHeader = @{
'Content-Type'='application\json'
'Authorization'="Bearer $($token.AccessToken)"
'X-AllowWithAADToken' = "true"
}

$uri = 'https://neur.proxyservice.ediscovery.office365.com/ediscovery/api/proxy/exportaedblobFileResult(blablabla)'
Invoke-WebRequest -Uri $uri -Headers $authHeader -Verbose -OutFile "D:\Downloads\1.zip"
The output will now be stored in the 1.zip file. Rinse and repeat for any additional files you need to download, and of course make sure to adjust their file names accordingly.


Is there a limit on the size of the files that can be downloaded? We are able to download small review sets i.e. <9gb, but always hit a limit at around 9gb and the download fails. We have tried using PowerShell (invoke-webrequest, httpclient, invoke-restmethod) and JAVA and the limit appears to be the same. We also tried on multiple machines and servers.
Invoke-webrequest or Invoke-restmethod works for small size of export. If export is big like 8+ GB then they fail. What is the alternative solution for the same using PowerShell? I tried start-bitstransfer but it doesn’t work
Hey Vasil,
Thanks for the article it really helped!
However, when I extract the data from that link it seems like it only contains the Metadata csv file and not any of actual data as you mentioned.
We’re you able to get actual files related to the search using this?
Thanks!
Are you downloading from both the URLs of the export? One URL is for meta data and other for content. How do you get the token? I am trying above code and it just keeps popping up username again and again indefinetely. Could you please help?
Hi Vasil,
As of now, the field of exportFileMetadata seemed to disappear. Do you know if it is due to permissions of Microsoft just removed it?
Thank you!
I can still see it. Make sure the operation has been completed, said filed only gets added once the export reaches 100%
Hi Vasil,
I could not get the token in the way you described it.
$token = $app2.AcquireTokenInteractive($Scopes).WithLoginHint(user@domain.com).ExecuteAsync().Result
May be my understanding is wrong, but “AcquireTokenInteractive” looks as it could not be used in an fully unattended script.
Could you please give me an hint, how to get the graph token with the scope eDiscovery.Download.Read using certificate based authentication [or if you preferr MSAL based] for a non-interactive unattended graph powershell script.
In your article you also mention, that eDiscovery.ReadWrite.All is neeed, to get it working, but the screenshot of the app registration and the token preparation part of the graph connection, does not contain “eDiscovery.ReadWrite.All” .
The microsoft documentation is also not very detailed on the topic “Export eDiscovery (Premium) datasets”, even a google search only finds your article, as the only one.
best regards
Ray
Unfortunately, the resource in question (b26e684c-5068-4120-a679-64a5d2c909d9, MicrosoftPurviewEDiscovery) only supports Delegate permissions, so you cannot use any of the client credentials flow, such as CBA. So in this regard, the solution can only be fully automated if you have obtained the token beforehand, and pass it as parameter to the script.
As to eDiscovery.ReadWrite.All, I couldn’t get the Graph Explorer examples to work without it. You are of course correct that it wasn’t needed when using my own app.
https://learn.microsoft.com/en-us/graph/api/security-caseoperation-get?view=graph-rest-1.0&tabs=http#response-1 (see the section beginning with “To automate the process and avoid the interactive sign-in page”) seems to imply it can in fact be fully automated.
However I’m having difficulty getting it to work. It won’t accept the X-AllowWithAADToken header, giving HTTP 400 each time. When I omit that header Invoke-WebRequest downloads the contents of a webpage, perhaps an interactive sign-in page of some kind?
That’s basically what the last code sample in the article above does. It’s still delegate permissions, so you cannot obtain token non-interactively. But once you do have a token, you can pass it and avoid having to login for the download part.
Keep a job to get refresh token every 30/45 mins, and use that refresh token to get access token in the code. From that access token you can connect-mggraph for the same.
how to refresh token in this case?