Ever since Multi-factor authentication was introduced within the service, Office 365 admins have been asking for mandatory verification to be triggered when performing certain actions. In fact, features such as the Attack Simulator back in the old Security and Compliance Center have been leveraging a form of “step-up authentication” to this effect, but for a long while now this has been the exception, not the rule.
Another form of enforcing additional controls was introduced via the Privileged Access Management feature, or PAM, which allowed you to configure an additional approval requirement, before certain operations can be performed. Unfortunately, the feature never got expanded to cover anything other than Exchange Online cmdlets, and slowly faded into oblivion for most Office 365 customers.
Now, Microsoft is previewing another feature that promises to address such requirements. Dubbed “protected actions”, the feature enables you to configure Conditional access policies to enforce requirements such as multi-factor authentication or use of privileged access workstations for performing certain Azure AD operations. For the time being, the list of supported operations is fairly small and limited to just management of Conditional Access policies and named locations, but hopefully this time around Microsoft will expand the feature to cover additional operations and workloads.
So let’s take a look at how the feature works. Let’s start with the actions that are currently supported by the feature, which you will find listed under the Roles and administrators > Protected actions page in the Azure AD blade. As no actions are defined by default, you will have to hit the Add protected actions button and select from the list of available actions, as shown on the screenshot below. Here, the terminology gets a little mirky, as the UI talks about “permissions to protect”. In effect, you will be “protecting” every action stemming from the selected permissions.
Adding the set of actions (as designated by the list of permissions you selected) is only part of the story. The actual “protection” is done by enforcing controls via Conditional access policies, such as requiring an MFA or a phish-resistant authentication method. The link between the protected actions and the CA policy that will enforce said controls is an authentication context object, which you select as part of the configuration of protected actions shown above (topmost dropdown). Do note that the authentication context must be created beforehand.
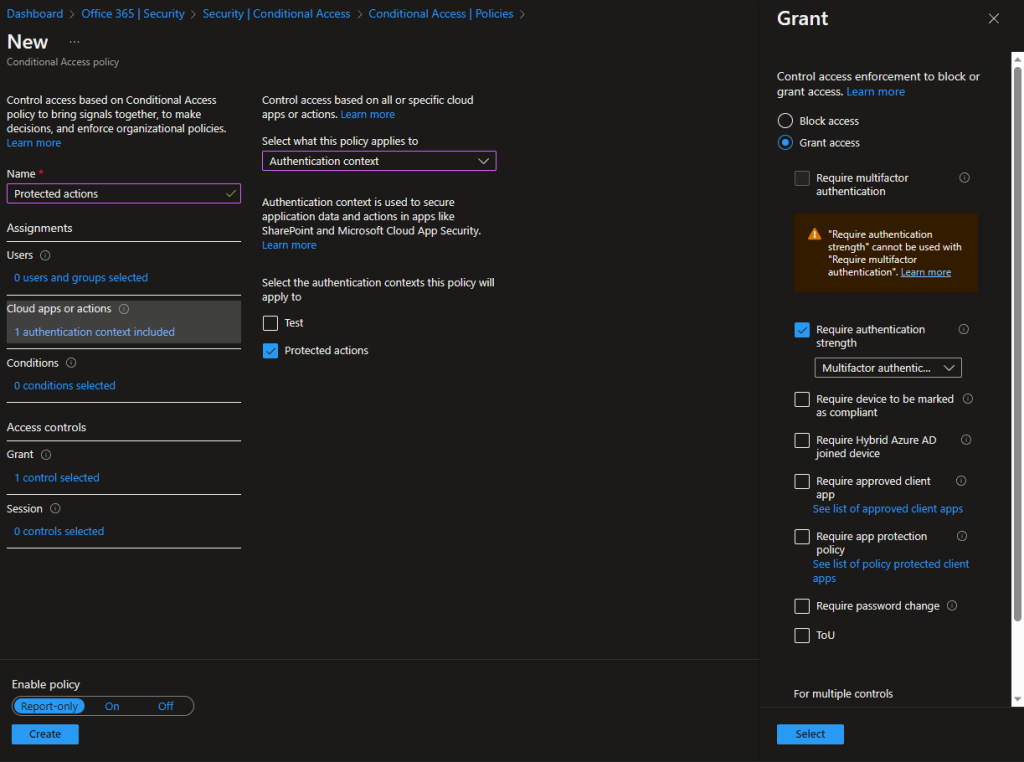
Thus far, we have a set of actions/permissions to protect, stamped with an authentication context. We now need to create a conditional access policy that will target said authentication context and enforce some conditions (we can of course reuse an existing policy if needed). The screenshot below shows a composite view of the required CA policy settings. First, make sure to select the desired authentication context under the Cloud apps or actions condition. Under the Grant control, configure the desired requirements, for example a specific authentication strength. You can also configure other conditions and/or exceptions as needed, such as limiting the policy to a subset of the users.
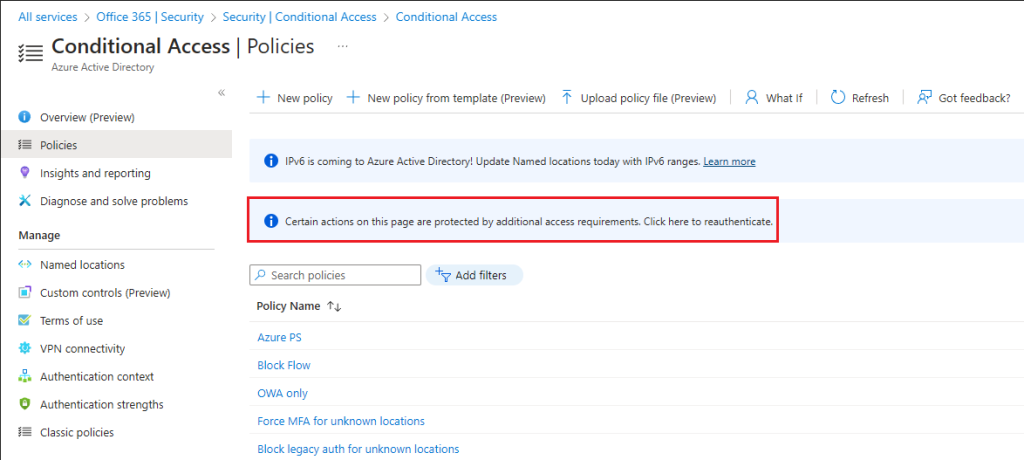
Once all building blocks are in place, we can test the configured protected actions. In our scenario, the expectation would be that any user trying to perform an action on CA policies or named locations will have to satisfy the required authentication strength condition. Indeed, logging in with a user under the scope of the CA policy will result in read-only experience within the Conditional Access > Policies page, with an info tip on top informing the user about the need to reauthenticate (screenshot below). Similar info tip will be displayed under any policy the user clicks on, and all relevant controls on the page will be disabled.
The user can click on the info tip to trigger the step-up authentication process. Once authentication requirements are met, the corresponding controls will be enabled and business can go as usual. And that’s what the feature is all about.
Now, as the feature is still in preview, few caveats need to be mentioned. First, and likely most important, is the fact that there is currently a known issue where the UI gets locked if you associate protected actions with an auth context that is not currently assigned to a CA policy. In other words, if you follow the steps I showed above, you get locked. To avoid this, make sure to first create a CA policy leveraging the desired auth context, and only then associate the context with the protected actions. The issue is mentioned in the documentation, but you can easily skim over it, so be warned! And if you end up in this unfortunate situation, you can use the https://aka.ms/MSALProtectedActions link as workaround. Or, clear the auth context associations via the Graph explorer tool, as I did.
Next, the list of currently supported actions is very limited. In fact, only the actions I selected above are supported, and they cover just the scenarios of managing CA policies and named locations. I would definitely love the see the feature expand its scope to cover more actions across Azure AD, and hopefully, across other workloads too. We don’t need another sad PAM story!
Speaking of supported scenarios, the client used must also be aware/support the step-up authentication process. For the time being, the list of such clients is quite short: the Azure AD/Entra Admin center, the Graph SDK for PowerShell and the Graph explorer tool. Older PowerShell modules, such as MSOnline and Azure AD, do not support step-up authenticaiton, and likely never will, given they are soon to be deprecated.
Graph API endpoints to list and manage protected actions are also available, though not exactly well documented. The experience is slated under the unified RBAC endpoints, and more specifically under the unifiedRbacResourceAction resource. As a short refresher, Unified RBAC is the planned suite-wide RBAC experience, featuring resourceNamespaces, each representing a different service, such as Azure AD or the recently added Exchange. Under each namespace, you get a list of supported actions. The process of making a given action “protected” one involves stamping the authenticationContextId property of said action with the desired authentication context. Let’s see some examples:
#List all resource namespaces
GET https://graph.microsoft.com/beta/roleManagement/directory/resourceNamespaces

#List all actions under the Azure AD (microsoft.directory) resource
GET https://graph.microsoft.com/beta/roleManagement/directory/resourceNamespaces/microsoft.directory/resourceActions

#List all actions that can be "protected"
https://graph.microsoft.com/beta/roleManagement/directory/resourceNamespaces/microsoft.directory/resourceActions?$filter=isAuthenticationContextSettable eq true

#As above, but include the relevant auth context properties
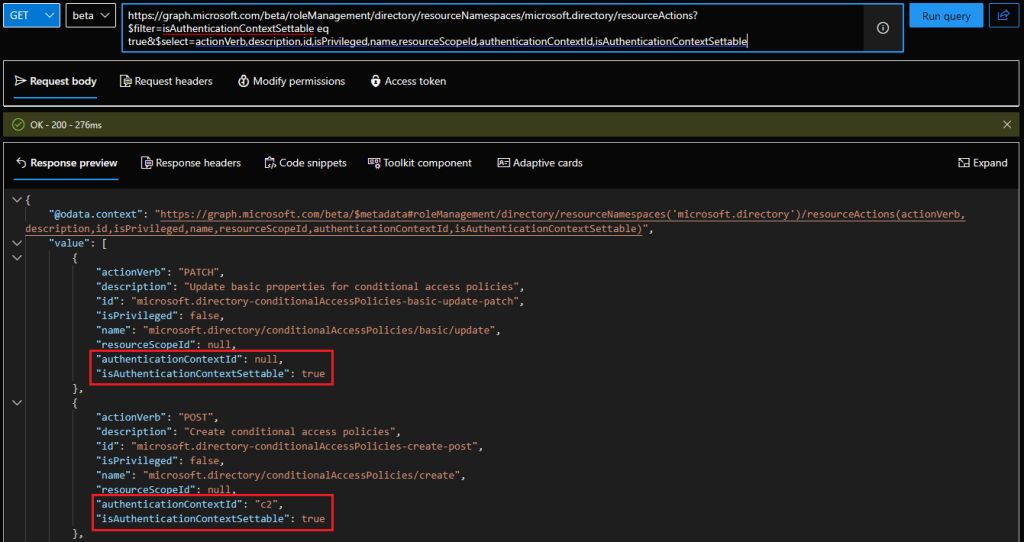
https://graph.microsoft.com/beta/roleManagement/directory/resourceNamespaces/microsoft.directory/resourceActions?$filter=isAuthenticationContextSettable eq true&$select=actionVerb,description,id,isPrivileged,name,resourceScopeId,authenticationContextId,isAuthenticationContextSettable
As highlighted on the screenshot above, two properties control the protected actions experience. First, the isAuthenticationContextSettable property determines whether a given action support the feature. The authenticationContextId property holds the link to the corresponding auth context, which is how you technically make an action “protected”. If you want to perform the operation via the Graph API, you will need to issue a PATCH request against the /resourceActions/{unifiedRbacResourceAction-id} endpoint and set the value of the authenticationContextId property. To “unprotect” an action, you clear the value. Here’s an examplе:
PATCH https://graph.microsoft.com/beta/roleManagement/directory/resourceNamespaces/microsoft.directory/resourceActions/microsoft.directory-conditionalAccessPolicies-create-post

{
    "authenticationContextId": null
}


2 thoughts on “Azure AD previews step-up authentication for admins via “protected actions””