Last month, we covered the introduction of custom Azure AD roles for user management. As with most things RBAC, the new bits are available only within the Azure AD blade. But the addition of new user-centric custom roles prompted me to examine how the Microsoft 365 Admin center has changed since the last time I took a deeper look, and in this article we will cover some of the new things I found therein. In a nutshell, those include improved support for Administrative units and AU-scoped roles, a “compare” functionality for roles and the “Run As” feature.
Let’s start with the Role assignments page, which you can access via the Microsoft 365 Admin Center > Roles > Role assignments or directly via this link. While this experience has been available for a while, it was recently improved and now shows AU-scoped role assignments as well. For example, in my tenant I have few users that have been assigned the User Administrator role, scoped down to a specific AU. If I select the User administrator role entry under the Role assignments page and click the Assigned tab, I will now be presented with both directory-wide and AU-scoped assignments:
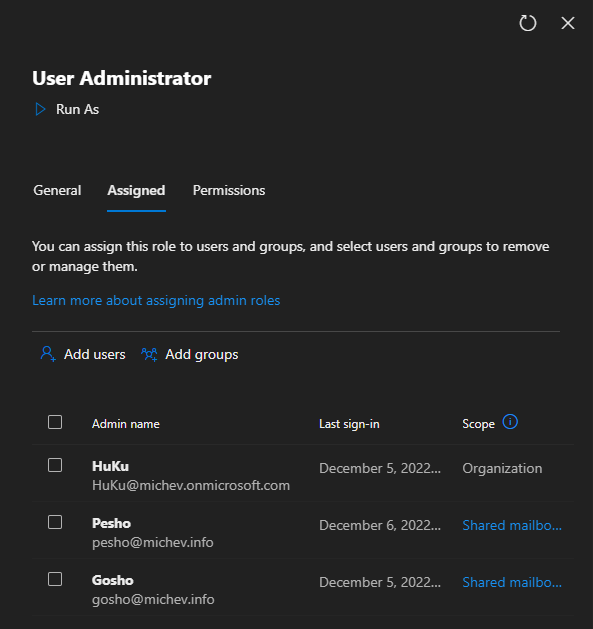 In addition, the number of assignments as displayed under the General tab includes AU-scoped ones. On the negative side, information about AU-scoped role assignments is still not shown under the Roles experience in the user’s card.
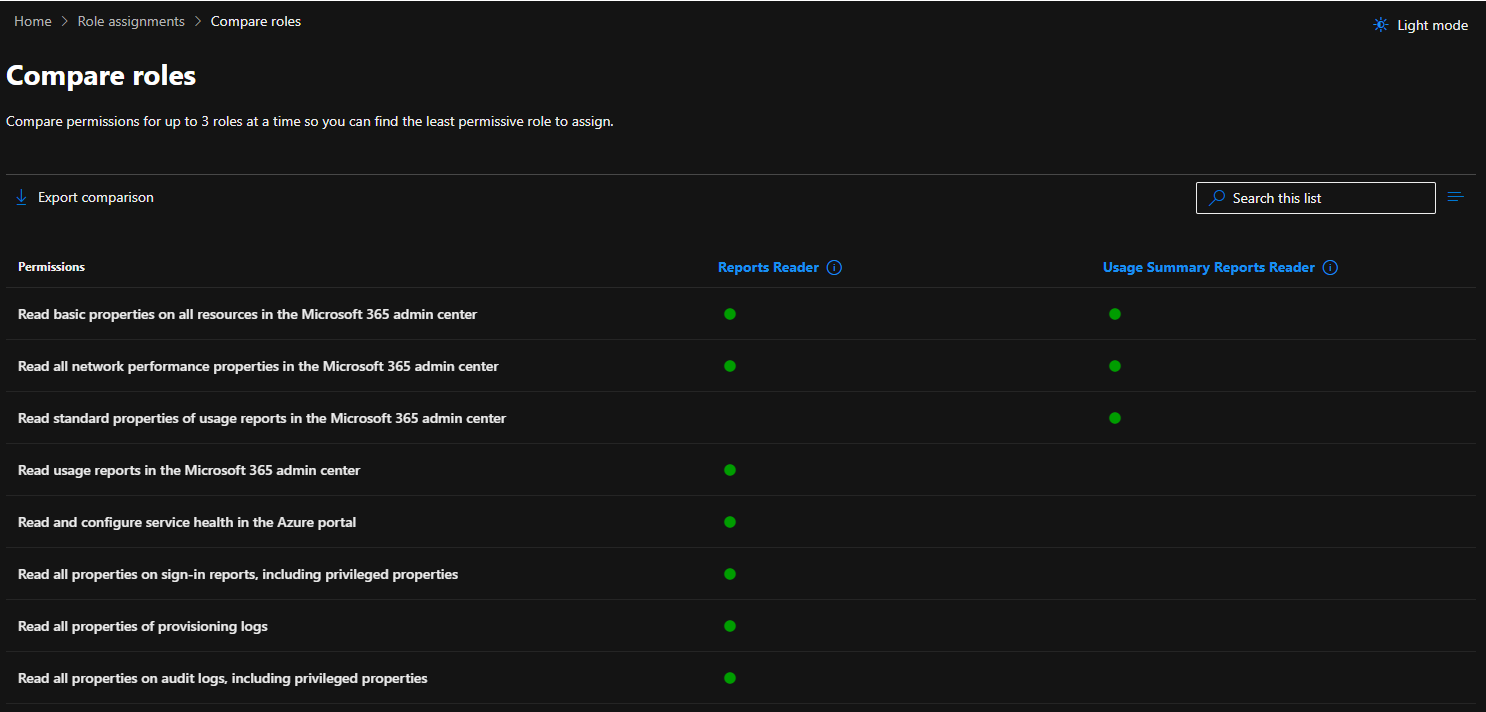
Another new feature is the ability to compare roles. To get to it, select up to three Azure AD roles, then press the Compare roles button on top. You will be taken to the Compare roles page, where you will get a detailed breakdown between the individual permissions included in each role’s definition. Of course, for a proper comparison you should select roles that have some sort of an overlap, for example the screenshot below shows the tally between Reports Reader and Usage Summary Reports Reader roles.
Even in it’s latest version however, the Microsoft 365 Admin Center’s Role assignments experience does not support custom Azure AD roles. Another important functionality missing is the integration with Privileged Identity Management. So while these improvements are certainly helpful, I’d still recommend sticking to the Azure AD blade, at least for the time being.
If you do want to use the Microsoft 365 Admin Center for role management, there is another new feature you might appreciate. The so-called Run As functionality allows you to “reload” the M365 AC UI in the context of a given role, that is the UI will simulate running under a user who has the given admin role assigned and toggle all the corresponding controls as necessary. This is a nice way to preview the effect of assigning a given role, at least when it comes to the availability of the relevant UI bits. For example, you can use this feature to double-check whether activating the Helpdesk administrator role will allow the user to open service requests.
To activate the Run As feature, navigate to the Roles > Role assignments page and select the role you’re interested in, then hit the Run As button on top of the right-hand pane (as seen on the first screenshot above). A new browser tab will open with the Microsoft 365 Admin Center UI toggled as per the permissions included in the selected role. The experience lacks some polish, but it still gives you an idea of what to expect when assigning a given role. In the example below, the Usage Summary Reports Viewer role has been selected, thus the M365 AC UI is rendered in a very restrictive mode, with just the Reports and Health sections visible. Note the message bar on top informing you about using the Run As mode, the role selected (bugged in this case), the fact that any changes made are actually committed, and the Exit Run As button on the far right.
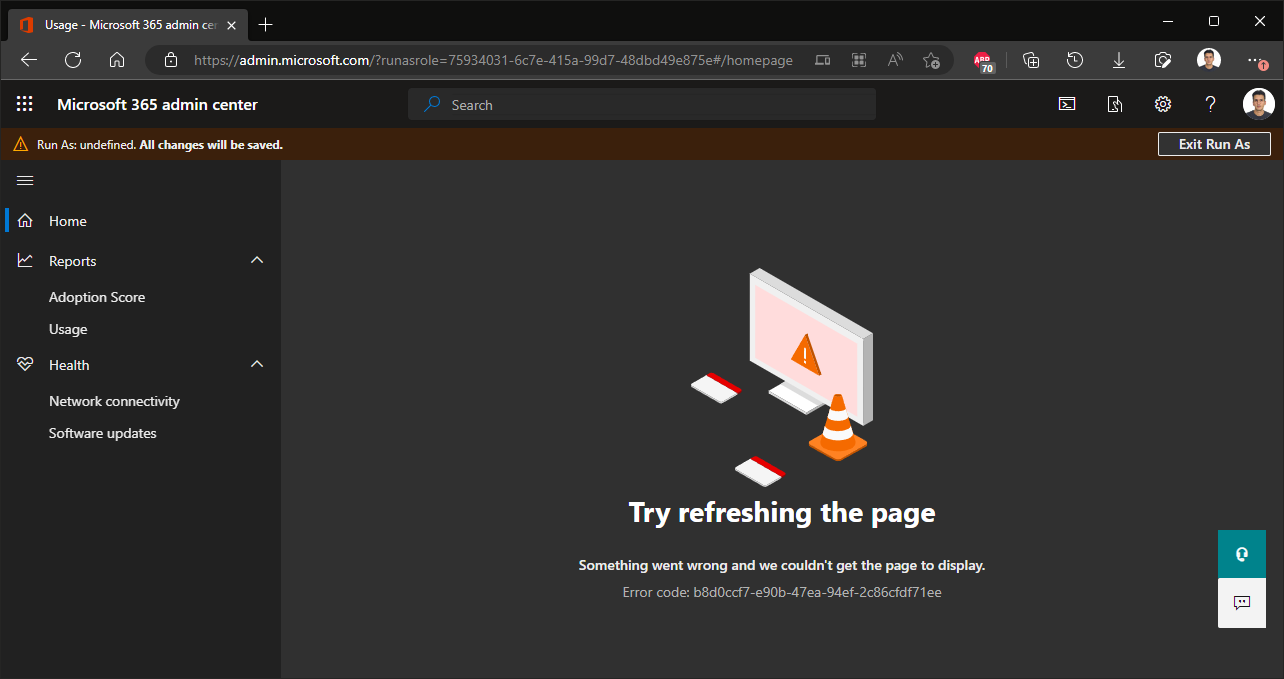 You might note the URL in the address bar, which gives you another way to launch the Run As feature, provided you know the GUID of the desired Azure AD role:
https://admin.microsoft.com/?runasrole=75934031-6c7e-415a-99d7-48dbd49e875e#/homepage
Next, let’s turn to the Administrative units improvements. Not only you can find a list of all AUs under the Roles > Administrative units page, but you can now also manage them directly within the Microsoft 365 Admin center. Well, with some limitations, such as the lack of support for device objects (as the M365 AC still doesn’t do devices). Dynamic membership is also not supported, and if you select an existing AU with dynamic membership rules configured, you will be presented with a deep link pointing to the corresponding experience within the Azure AD blade.
To create a new Administrative unit, hit the Add unit button on top. You will be presented with the familiar “wizard” experience. On the initial page, you can enter a Name for the AU, and optional Description. Next, you will be taken to the Add members page, where you can either manually Add up to 20 users and groups, or provide a CSV file to provision up to 200 members, via the Upload users selection. As mentioned already, dynamic membership is not supported, and neither is adding device objects. Keep in mind that this part of the process is optional, so you can just skip to the next page.
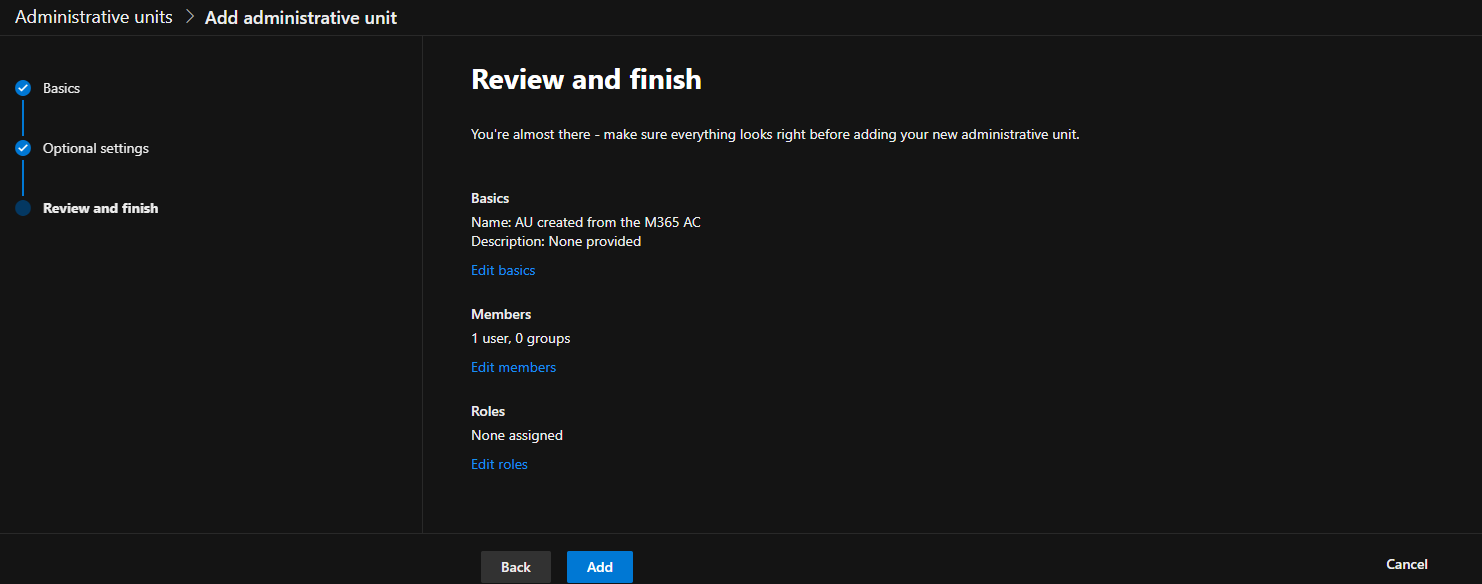 Next, you can choose whether to add scoped role assignment, based on the current AU. This is also an optional step, configured under the Assign admins to scoped roles page of the wizard. You will be able to select from a list of 10 Azure AD roles, which unlike the Azure AD blade experience does not include custom-created roles. To create a scoped role assignment, select a given role, say User Administrator, then hit the Assign admins button on top. Keep in mind that the button only appears after you have selected a role. Hitting the button will force a new pane to appear on the right-side, allowing you to add individual users or groups. Again, this part of the process is optional and can be configured later on. Hitting the Next button will take you to the Review and finish page, where you can double-check the selection made and confirm the creation of the new AU.
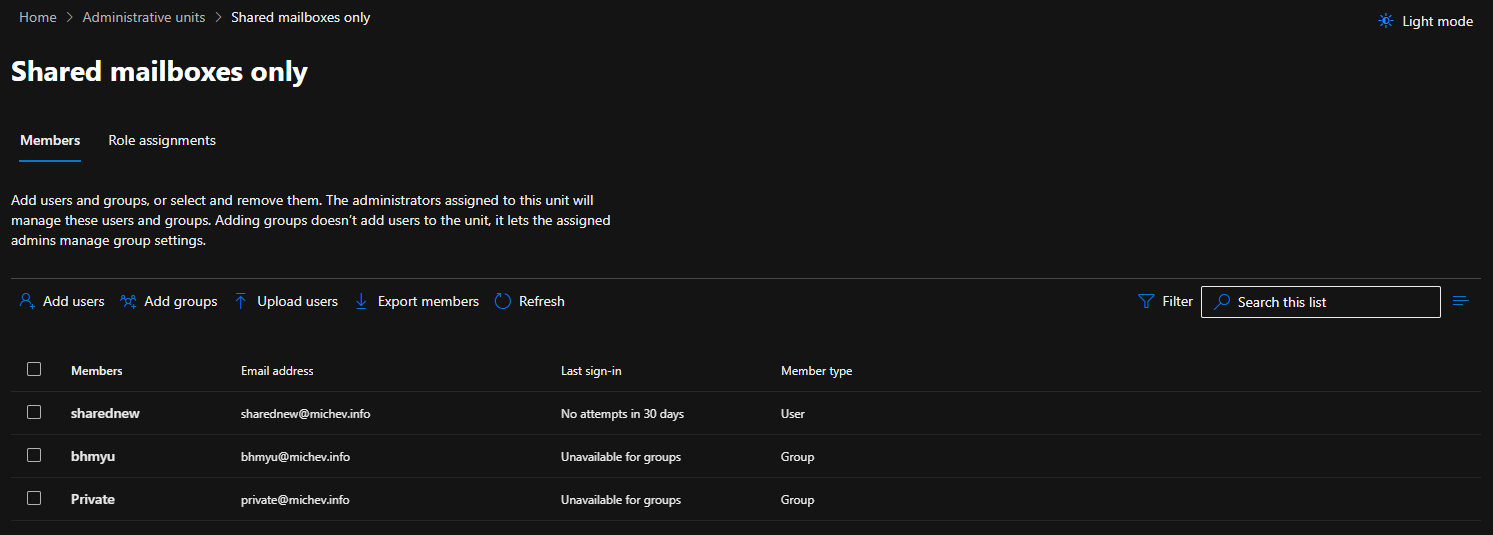
To manage an existing AU, click it’s name in the list of AUs available within the tenant. This will take you to the Members page, where you can add/remove users and groups as needed (again, no devices). In addition, you will be able to Upload users or Export members, by hitting the corresponding button. If the AU is using dynamic membership rules, you will only be able to see the current list of members, and use the redirect link to the Azure AD experience, where you can make changes as needed. A basic Filter functionality is also available.
 To edit the list of users who have been granted permissions to manage objects within a given AU, go to the Role Assignments tab. As with the AU creation process, you will be presented with a list of supported roles, but interestingly enough, this time we’re not shown a count of current active assignments. To create an AU-scoped role assignment, select the role in question, hit the Assign admins button on top and add users or groups as needed. On the same pane, you can remove existing role assignments.
Should you want to change the name and/or description of an AU, you can do so under the Administrative units landing page, by selecting the corresponding AU and hitting the Edit name and description button. Similarly, to remove an existing AU, select it and hit the Delete unit button.
So in summary, Microsoft has introduced a set of new features within the M365 Admin Center, which bring the Role management experience a step closer to parity with other endpoints. We now get information about AU-scoped role assignments at least in some parts of the UI, can manage AUs directly within the M365 AC, can compare Azure AD roles and even preview the effects of assigning a given role. Overall, a good set of additions, though there are still some missing pieces that require you to use the Azure AD blade, PowerShell or the Graph API instead. Hopefully, Microsoft will address these in the future.
Hi Michev! thanks for the great articles! I’ve been searching around and trying to figure out how can I remove a user from “eligible” assignment to AAD roles (e.g Helpdesk Administrator, Security Reader etc.) using a powershell script. The script I’m using only removes the user if the role is activated. Do you know if there’s any aad cmdlet that I can use to remove the user from “eligible” assignment?
You can use Get-MgRoleManagementDirectoryRoleEligibilitySchedule from the Graph SDK for PowerShell to list them, Remove-MgRoleManagementDirectoryRoleEligibilitySchedule to remove.
Hi Michev,
Happy New Year ! and thank you for the great post.
I’m trying to move to using AU’s but have couple of issues. It looks like assigning Teams Administrator and Teams Device Administrator scoped to AU doesn’t do anything. I don’t even have access to the Teams admin portal.
Assigning SharePoint Administrator also gives admin privileges to the entire directory – if it can’t be scoped then why it is available for AU’s ?
With the AU admin account I can see all members of the AU in Microsoft 365 admin center but can’t see Mail and OneDrive properties. I have assigned almost all possible roles in Exchange to the AU admin scoped with RecipientAdministrativeUnitScope but still no luck. It works if I assign Exchange Administrator, but that one can only be assigned on directory level.
I can live with the rest 🙂 , but is there a way how I can fix the Mail properties issue ?
Thanks !
Exchange RBAC roles do not support AUs, yet. You can create matching scopes using the Exchange RBAC model to the same effect. Similarly, there’s limited support for SPO/ODFB/Teams.
Actually, you CAN create an AU-scoped role assignment, via the -RecipientAdministrativeUnitScope parameter. There are still some limitations on the UI side of things though.