The Office 365 Reporting Web Service has been around for a long, long time, and remained the primary method for collecting Office 365 usage data at scale until the introduction of the Graph API reporting endpoints. In fact, even today some organization use it to fetch message trace data, as the Graph does not offer a valid replacement and the PowerShell cmdlets don’t scale well.
Unfortunately though, the Reporting web service hasn’t received any updates since around ~2015, apart from the various report deprecations. Given that the service is powered by Exchange Online’s backend, as time went by some organizations and ISVs grew increasingly worried about the upcoming basic authentication deprecation in Exchange Online, and what it spelled for the Reporting web service. In early 2022, Microsoft published a Message Center post to inform customers about incoming support for OAuth, and after several delays, I’m happy to inform you that the feature has now been rolled out. Let’s take a look at how to access the Reporting web service via Modern authentication!
As with all other implementations of Modern authentication we’ve discussed on this blog, the process involves getting an access token and passing it to the relevant endpoint. To obtain the token, you will need to have an Azure AD app registration with the relevant permissions granted. While the official documentation has been updated to flesh out some of the details on this, it features incorrect values for some of the endpoints needed, so my description here will be a bit more tedious than usual.
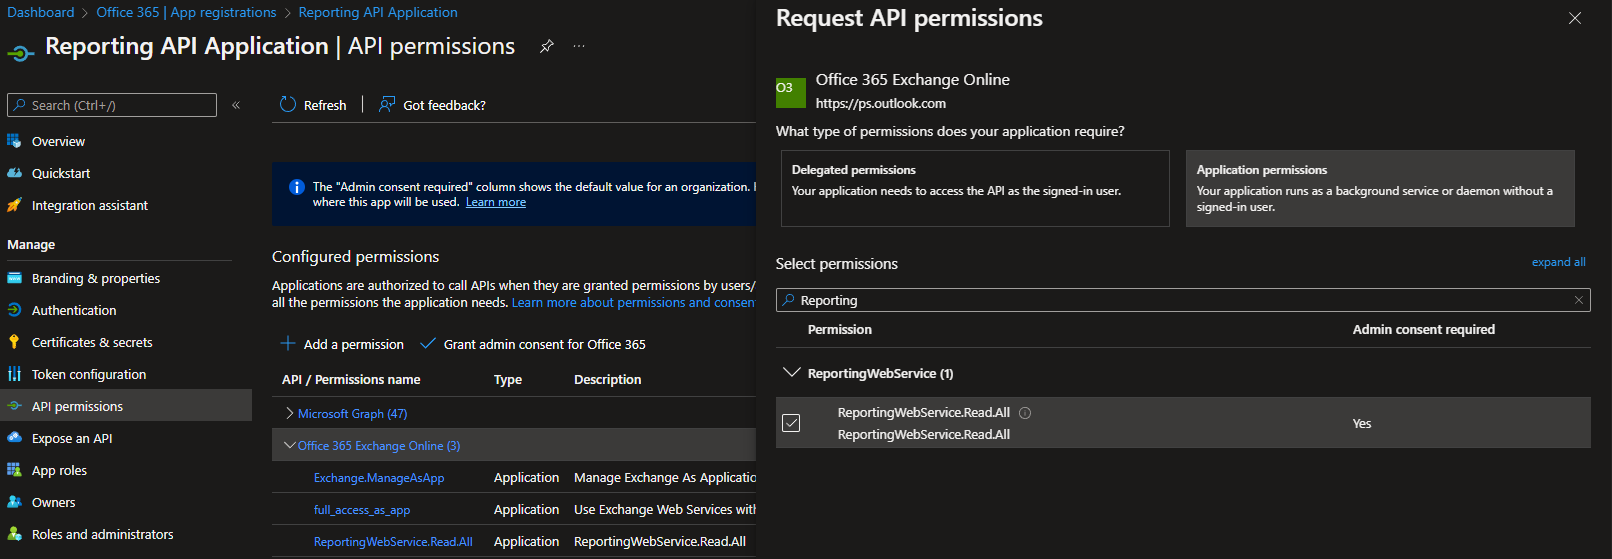
First, we need an Azure AD app registration. Any existing one would do, but you can provision a new app if needed. Make sure to configure the relevant platform and authentication settings as needed, detailed instructions can be found for example here. As the Reporting web service supports both the delegate and application permission models, you are free to configure anything you want at this point. Speaking of permissions, the required entry, ReportingWebService.Read for delegate permissions or ReportingWebService.Read.All for application ones, can only be found under the Office 365 Exchange Online resource. As Microsoft has since hidden the relevant entry under the Request API permissions pane, you will have to follow the instructions from this article to get to it.
Once you have added the relevant permissions and consented to them, we are ready to request a token. As mentioned above, we can use either the delegate or application permission models, so any of the public and/or confidential client flows will do. Apart from the credentials, the only other thing you’d need to provide is the scope value (or resource if using good old ADAL). Do note that the correct value here is https://outlook.office365.com/.default and not manage.office.com, as the official documentation examples suggest (and if you are using ADAL, the resource value should be https://outlook.office365.com)! Here are some examples on how to obtain a token:
#MSAL
Add-Type -Path "C:\Program Files\WindowsPowerShell\Modules\MSAL\Microsoft.Identity.Client.dll"

#Delegate permissions
$app2 = [Microsoft.Identity.Client.PublicClientApplicationBuilder]::Create("b370cebe-f369-413e-a927-2a2cd80953a0").WithRedirectUri("http://localhost/").WithTenantId("M365x60680951.onmicrosoft.com").WithBroker().Build()
$Scopes = New-Object System.Collections.Generic.List[string]
$Scope = "https://outlook.office365.com/.default"
$Scopes.Add($Scope)

$token = $app2.AcquireTokenInteractive($Scopes).ExecuteAsync().Result

#Application permissions via client secret
$app = [Microsoft.Identity.Client.ConfidentialClientApplicationBuilder]::Create("b370cebe-f369-413e-a927-2a2cd80953a0").WithClientSecret("xxxxxxxxxxxxxxxxxxxxxxxxxxxxx").WithTenantId("M365x60680951.onmicrosoft.com").Build()
$Scopes = New-Object System.Collections.Generic.List[string]
$Scope = "https://outlook.office365.com/.default"
$Scopes.Add($Scope)

$token = $app.AcquireTokenForClient($Scopes).ExecuteAsync().Result
I’m also including an ADAL-based example here, just for the purpose of illustrating the importance of the value of the resource parameter. Even though you can still use an ADAL token against the Reporting web service, this is not recommended.
#ADAL
Add-Type -Path 'C:\Program Files\WindowsPowerShell\Modules\AzureAD\2.0.1.10\Microsoft.IdentityModel.Clients.ActiveDirectory.dll'

#Application permissions via client secret
$authContext4 = New-Object "Microsoft.IdentityModel.Clients.ActiveDirectory.AuthenticationContext" -ArgumentList "https://login.windows.net/michev.onmicrosoft.com"
$ccred = New-Object Microsoft.IdentityModel.Clients.ActiveDirectory.ClientCredential -ArgumentList "xxxxxxxx-xxxx-xxxx-xxxx-xxxxxxxxxxxx", "xxxxxxxxxxxxxxxxxxxx"
$authenticationResult = $authContext4.AcquireTokenAsync("https://outlook.office365.com", $ccred)

$token = $authenticationResult.Result
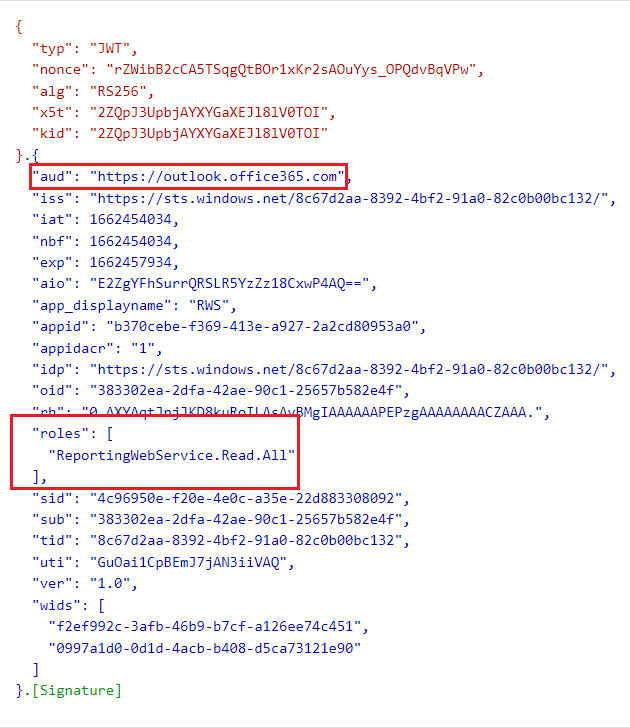
Here is also an example on how a decoded token looks like:
 Remember that if you are running in the delegate permissions model, the user will need to have an appropriate admin role assigned as well. The supported roles for the Reporting Web Service are Global Reader and Security Reader.
Now that we have a valid token, we can query the Reporting web service. For example if we want to query the Message trace data for the past 48h, all we need to do is query the relevant endpoint, https://reports.office365.com/ecp/reportingwebservice/reporting.svc/MessageTrace, and pass on the token via an Authorization header:
$authHeader1 = @{
'Authorization'="Bearer $($token.AccessToken)"
}

$uri = 'https://reports.office365.com/ecp/reportingwebservice/reporting.svc/MessageTrace'
$Gr = Invoke-WebRequest -Uri $uri -Verbose -Debug -Headers $authHeader1

$Gr.Content
The process itself is almost identical to using basic authentication, as illustrated by the below example:
#Basic auth
$cred = Get-Credential admin@M365x60680951.onmicrosoft.com

$uri = 'https://reports.office365.com/ecp/reportingwebservice/reporting.svc/MessageTrace?$format=json'
$Gr = Invoke-WebRequest -Uri $uri -Verbose -Debug -Credential $cred
As another example, lets query the metadata document:
$uri = 'https://reports.office365.com/ecp/reportingwebservice/reporting.svc/$metadata'
$Gr = Invoke-WebRequest -Uri $uri -Verbose -Debug -Headers $authHeader1
We can now explore the metadata, but sadly it doesn’t look like Microsoft has made any changes here, so expect to see tons of deprecated entries:
$metadata = [xml]$gr.Content
$metadata.Edmx.DataServices.Schema.EntityContainer.EntitySet
Still, there are some useful reports available therein, not mentioning the message trace data. So, using the method outlined above, we can continue using those even when Microsoft shuts down basic authentication later this year.

Heyy i have also added the permissions as mentioned for global readers and am able to generate a token (which includes a ReportingWebService.Read.All application role)
But while fetching via API it shows no permission to report for organizations
I have subscription active, Can you help what am i missing
Hi I have the same error “No permission to access the report for the organization” did you ever find a solution ?
How do you assign Global Reader or Security Reader when using Application permissions?
Simply select the corresponding service principal object after pressing the Add assignments button. You can search for it by name or the GUID.
Hello. Thanks for the tutorial. When trying to follow the steps, even if I am able to generate a token (which includes a ReportingWebService.Read.All application role), when I try to make a request to the API, I am getting this error:
No permission to access the report for the organization .
I have an active subscription and also the mentioned permission. Could you please tell me what I am missing?
Thanks in advance.
Did you assign the admin role as well? At least Global Reader or Security Reader are required.
I think this is what I am missing, but I do not know how to do that.
I saw that another user posted a question regarding this, but I do not understand your reply because I do not know what are you referring to (more specifically, where from the web UI we can do such a thing). Could you please point us in the right direction?
Thanks in advance.
Go to the Azure AD blade > Roles and administrators > Global reader > Add assignment > Select the service principal corresponding to your app
Sorry for my ignorance, Vasil, but when I try to follow your steps, at the “Add assignments” sidebar from the Global Reader role in the Azure AD app, I cannot see any of my application registrations, only registered users and nothing else. Do you know why this might be happening? I believe this is the last thing I am missing from the steps you provided (thanks for that!).
Just search for it, either by name or GUID.
Hello again, Vasil.
Thank you very much for your help! Yes, searching by the Client ID worked for me, and once the role was assigned I got the chance to access the Reporting Web Service and its endpoints.