In August 2022, an Graph API changelog update revealed the addition of a new “external identities” policy under the /policies node. The corresponding externalIdentitiesPolicy resource consists of three settings, as follows:
- displayName – a read-only string, representing the policy name. Should be set to “External Identities Policy” in all tenants.
- allowDeletedIdentitiesDataRemoval – the most interestingly-sounding one, but currently inoperable setting.
- allowExternalIdentitiesToLeave – a setting that enables/disabled the option for external users to leave a guest tenant.
In this article, we will focus on the last setting, which is the only one you can actually change currently. Interestingly enough, at the time this update was pushed, the API didn’t allow for any settings to be changed, and Microsoft confirmed that the update notification was released prematurely. A month later, Microsoft posted a short description of the feature under the Azure AD changelog, effectively announcing its Public Preview status. Since then, the setting has made its way to the Azure AD UI and is also featured as part of the recently released cross-tenant sync feature.
So what does the setting do and why would you use it? As the name suggests, the allowExternalIdentitiesToLeave setting controls the ability for end users (Guests) to leave a given guest tenant. By default, each end user would be able to do so, by leveraging the built-in flow (i.e. Access My account > Manage organizations > Leave). Provided their account was in good standing, the process would then remove their account from the guest tenant, effectively soft-deleting it. The process is of course not applicable to the home tenant.
Thus until recently, the process was entirely driven by the end user themselves. With the newly introduced controls, each “guest” tenant will now have a say in the process. An admin will be able to configure the allowExternalIdentitiesToLeave setting in order to block this self-driven process. When the setting is toggled off, an end user will no longer be able to complete the process. Instead, they will be presented with information about the company’s Privacy statement and Privacy contact, thus requesting that they follow the organization’s established process instead.
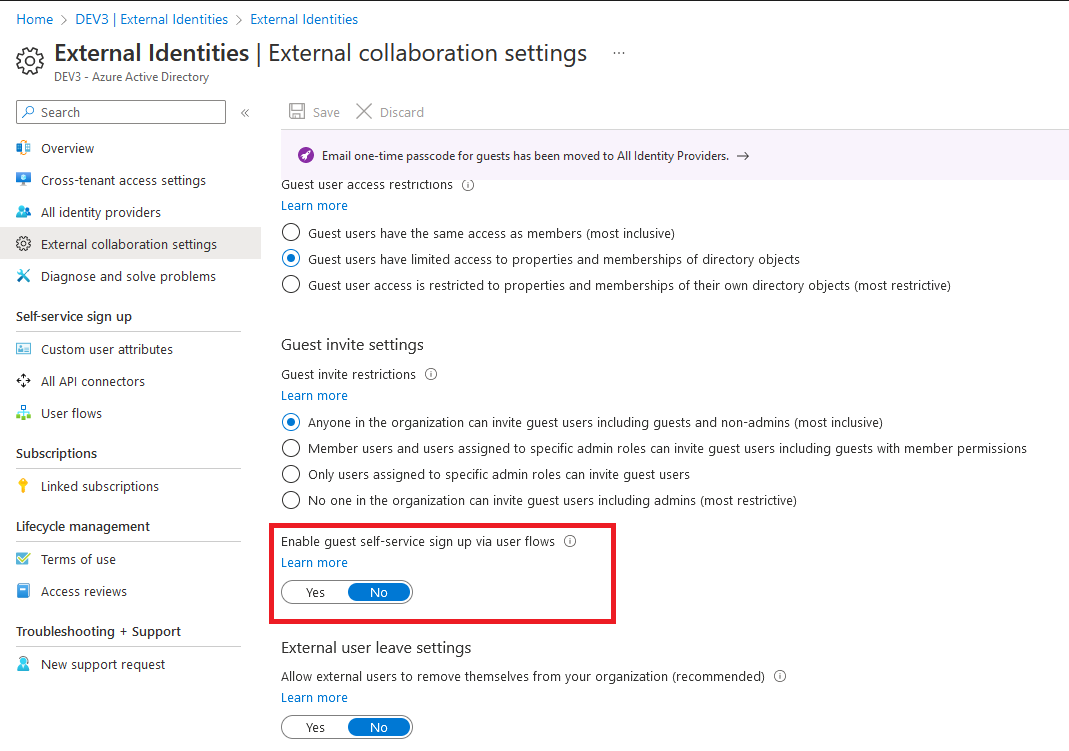
To configure the setting via the UI, open the Azure AD blade, navigate to the External Identities page, open the External collaboration settings and toggle the value under External user leave settings, as shown below:
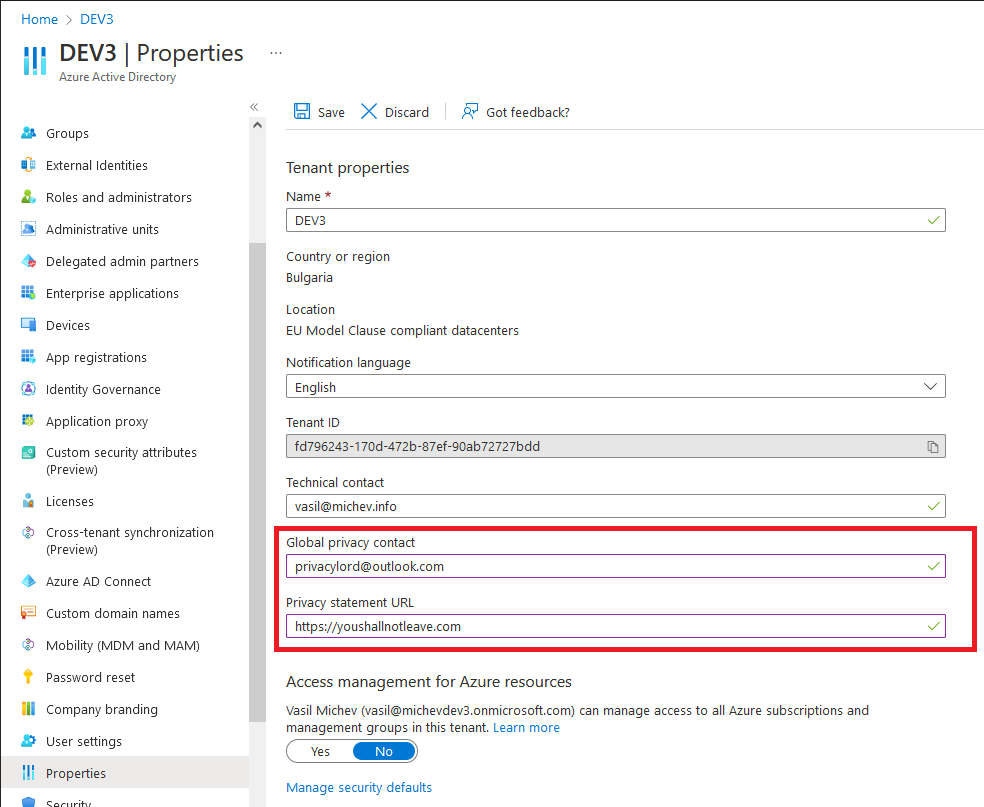
 What the UI doesn’t tell you though is that in order to toggle the setting Off, you need to have configured the Privacy-related information, mentioned above. To do this, open the organization’s profile under the Azure AD blade > Properties and make sure to fill in both the Global privacy contact and Privacy statement URL fields. There’s no requirements as to what values you can enter, so you can for example use an outlook.com address.
 Once those fields have been updated, you should be able to toggle the value of the allowExternalIdentitiesToLeave setting to No. Should you want to update the setting via the Graph API instead, use a PATCH request against the /policies/externalIdentitiesPolicy endpoint:
PATCH https://graph.microsoft.com/beta/policies/externalIdentitiesPolicy
 Remember to check and update the Privacy settings first, as otherwise you will be greeted with the following error message:
“Cannot disable AllowExternalIdentitiesToLeave since PrivacyProfile on the organization resource has not been specified. Please update the PrivacyContact and PrivacyStatementUrl on your organization’s PrivacyProfileusing the Update organization API.”
You will find the corresponding properties under the /organization endpoint and the privacyProfile resource. Remember also that you will need permissions to update them, namely Organization.ReadWrite.All, in addition to the Policy.ReadWrite.ExternalIdentities needed to update the actual policy.
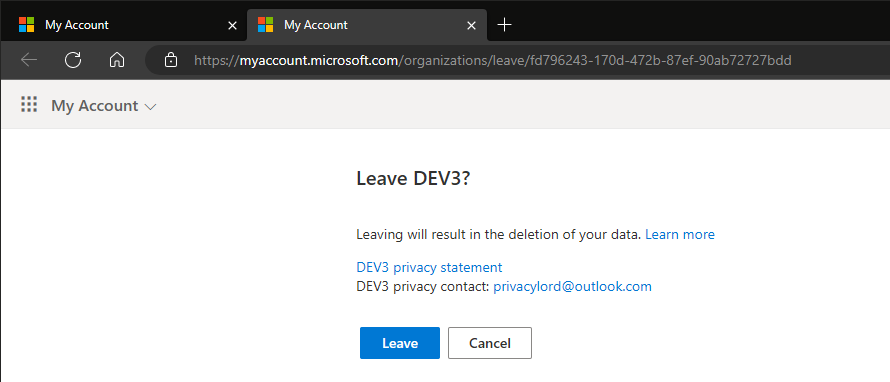
For the sake of completeness, here’s how the end user experience will look like, once you toggle the setting. When the user navigates to the Manage organizations page and hits the Leave button, he will be redirected to a new page, where the Privacy information will be displayed. Do note that this page will be displayed regardless of the value of the allowExternalIdentitiesToLeave setting.
 Hitting the Leave button here will result in another redirect, this time to a page informing them about the futility of their attempts to leave:
 If instead the setting allows for end users to leave the Guest tenant, the process will be completed and the Guest account removed:
 Oh, and in case you were wondering, both external users with userType set to Guest and those with userType set to Member can leave guest tenants.
