Many organizations want to tightly control the different admin functions delegated to members of their IT operations or Helpdesk teams. With the latest additions to the Security and Compliance Center in Office 365, we can now create custom management roles and grant just the right set of permissions.
Managing SCC roles via the UI
To create a new admin role, open the Security and Compliance Center and navigate to the Permissions tab on the left, or just click here. The list of built-in role groups will be displayed, along with some introductory text. To start the process, press the Create button. You will have to provide a Name and a short Description for the new role group.
On the next step, you will have to specify the individual roles to include in the newly created groups. This is the most important part of the process – make sure to select just the roles (actions) you need! For example, if you want to create a custom role that only allows people to perform eDiscovery Search operations, but no Export or Delete, you can add the corresponding Search role only. To do so, press the Choose roles link, then press the Add button, locate the role(s) and press the Add button, then finish up by pressing the Done button. Here’s an example with just the Compliance Search role added:
Once you have added all the desired roles, press the Next button to continue with the creation process. You will now have to specify the users to which the role will be assigned. To do so, press the Choose members link, then the Add button to get a full list of users. Select the ones you want, press the Add button again and then the Done button to confirm. It is not mandatory to provide users now, you can simply create the role group without assigning it to anyone at this point.
Lastly, you will be presented with the Review page, where you can perform last checkup before creating the new role group. If everything is in order, press the Create role group button.
The new role group will now be presented in the list. Selecting it will pop up a pane on the right, with the options to Edit, Delete or Copy the role group. Note that you can only delete custom created role groups. The built-in role groups can be edited, but you cannot add/remove roles to them – you can simply change the list of users assigned to the role. You can however use the Copy button to create a new role based on a built-in one and then make any changes you see fit.
That’s pretty much everything you can do with roles and role groups in the SCC. Unlike Exchange, you cannot create custom roles, play with role assignments, or change role scopes. You can however perform the actions described above via PowerShell, so let’s also cover that part as well.
Managing SCC roles via PowerShell
The process is very similar to the way we manage roles via Exchange Online PowerShell, which is of course expected, considering the SCC uses the same backend. If you need help connecting PowerShell to the SCC, you can refer to our recent article on the subject.
Once you are connected, you can play with the SCC PowerShell cmdlets. In our particular case, the cmdlets we can use to manage roles and role groups are the following:
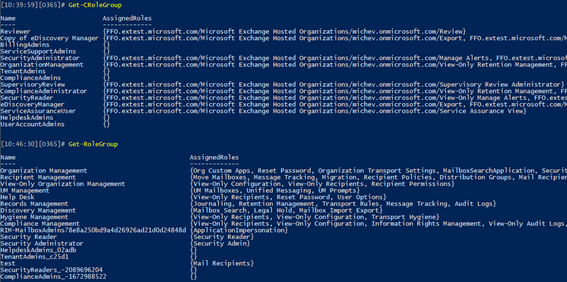
We can start by viewing the list of roles and role group and compare it to the ones Exchange Online. For example, the picture below compares the set of role groups in the SCC (top half) and the role groups in ExO (lower half):
Similarly, the list or individual roles can also be compared:
If you want to create a new role group, use the New-CRoleGroup cmdlet (note the prefix “C”, which I’ve added to my PowerShell session in order to distinguish between Exchange Online and SCC cmdlets). As the creation process involves adding roles to the role group, we can refer to the above list to get their names. We create the role group via the New-CRoleGroup cmdlet:
As we didn’t specify any members for the role group when creating it, we can now add them via the Add-CRoleGroupMember cmdlet and then check the membership via Get-CRoleGroupMember:
Easy enough, right? Additional actions can be performed via the Set– or Remove-CRoleGroup cmdlets, in order to edit or delete the role group, respectively. If you want to modify the membership of the role group, you can also use the Update– and Remove- CRoleGroupMember cmdets.


