Microsoft recently introduced an overhaul of the eDiscovery and Content Search UI in the Security and Compliance Center as part of Office 365. Now, a new related feature has been released, one that simply packages those changes in a format that can be used to meet some of the requirements of GDPR. Namely, this is the Data Subject Request cases feature, or DSR cases for short.
So, what does a Data Subject Request actually mean? As part of GDPR, users (Data subjects) are given the “right to be forgotten”, as well as the right for “data portability” and “data access”. In other words, to know what kind of data is kept within our systems, to be able to export it and to demand that the data is removed. In Office 365, all of these are facilitated by the eDiscovery (or Content Search) functionality, and the corresponding controls have been available for years. What the DSR cases feature does essentially is to guide you over that process.
To access the new feature, you need to navigate to the SCC and press the Data Privacy node on the left, then select DSR cases. Alternatively, you can access it via the GDPR Dashboard, which can also be used as entry point for creating new DSRs, as well as getting an overview of any cases created in the past 60 days. If you prefer to use a direct link, you can also just navigate to https://protection.office.com/#/dsrcases directly.
In case you find the UI oddly familiar, it’s because this is simply a reskin of the new eDiscovery UI, with just the description and button text changed to “DSR”.
To create a new DSR case, simply press the New DSR case button and follow the steps of the wizard that pops up in the right pane. The process is very, very simply. All you need to provide is the Name of the case, an optional Description, and specify one or more Users (Data Subjects). Although the UI technically allows you to specify multiple users, I’d recommend just creating separate DSRs per each user. After specifying the user, simply Confirm and Save the DSR case. You will also be asked whether you want to run the Search now, or postpone it for later.
Once the DSR case is created, you can assign Members or Role Groups to it, just like you would do with any other eDiscovery case. Same goes for all the other actions you can perform, so there is no point of going over them in detail. In case you need additional information, make sure to review the documentation or out overview of the new eDiscovery UI over at the Cogmotive blog.
The only interesting fact around DSR cases is the Search Query used to surface all the data. The query is automatically generated when you run the New DSR case wizard and includes a veeeeeery long set of keywords, as depicted below:
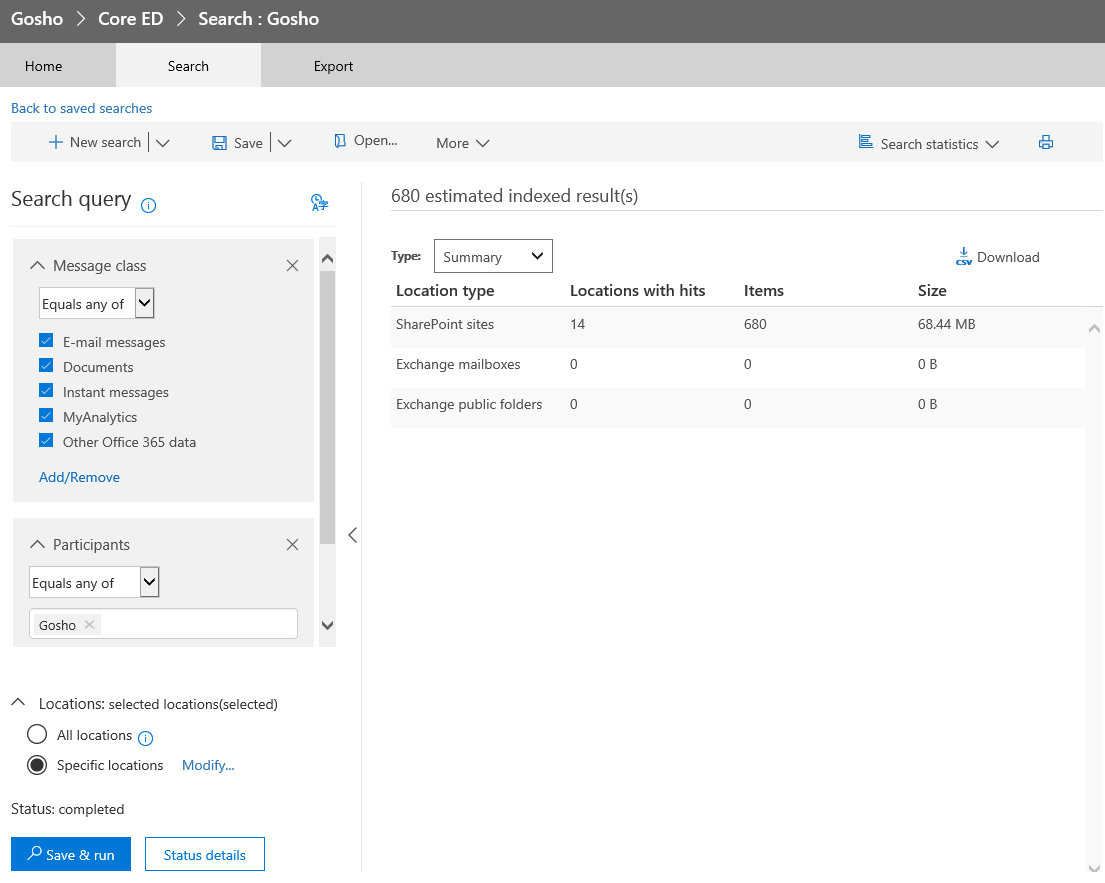
Basically, it’s a query includes every ItemClass recognized by the different Office 365 services and has our Data subject (user) as participant. In effect, what the DRS case wizard does is to save you from having to type all that.
The other interesting moment is the Locations to which the search is limited to. By default, those include the user’s mailbox, all SharePoint sites and all Public folders in the organization. That’s right, no additional Group/Team mailboxes are searched, neither are any other mailbox types. In case you want to include say conversations from a particular Team involving that user, you might want to edit the query locations. The same of course applies to the Search query keywords.
The below screenshot shows how the Search query looks in the UI, as well as the results breakdown per workload:
Once you are satisfied with the results, you can export a report of the search or the actual items if needed, and present them to the user. Again, the process doesn’t differ from running a “regular” eDiscovery search/export, so I’ll not go into more detail here.
Lastly, in case you want to use PowerShell to manage DSR cases, all you need to do is connect to the SCC and use the familiar *-ComplianceCase/*- Get-ComplianceCaseSearch cmdlets. A new parameter has been introduced to designate DSR cases, namely the -CaseType parameter. Using it, you can work with any existing DSR cases or create new ones. Here’s an example:
Get-ComplianceCase -CaseType DSR

Name Status CreatedDateTime
---- ------ ---------------
Vasilcho Active 02/05/2018 11:56:02
g Active 23/04/2018 18:52:16
Happy DSRing!


