Microsoft introduced the Ownerless group policy feature few months back, which Tony covered in detail over at Practical 365. Interestingly, back when the feature was still in preview, we got a set of Exchange Online PowerShell cmdlets to get its status and/or manage it, namely Get-OwnerlessGroupPolicy and Set-OwnerlessGroupPolicy. Even more interestingly, Microsoft has since removed said cmdlets and you can no longer find them as part of the “V3” module, or any (GA) version other than 2.0.5 for that matter.
True to its erratic behavior, Microsoft is yet to release a Graph API endpoint for said Ownerless group policy feature, so the only way you can get to it currently is via the Microsoft 365 Admin center. Which makes the disappearance of the *-OwnerlessGroupPolicy cmdlets that more puzzling. But since the cmdlets did exist at some point and even worked as expected, this cannot stop us from exploiting the methods behind them. So, in this article, I will walk you over the process of “reverse engineering” the Get-OwnerlessGroupPolicy and Set-OwnerlessGroupPolicy cmdlets, and present our own versions of them.
The discovery process
We start by loading up an older version of the ExO PowerShell module, such that had a working copy of the two cmdlets. The version in question is 2.0.5 as already mentioned above, and in fact both cmdlets still work as expected therein! But as a newer (and better!) versions of the module has been released since, we don’t want to still use the good old 2.0.5 branch.
There are few ways we can go about “reverse engineering” the cmdlets. One is to simply look at their definition within the Microsoft.Exchange.Management.RestApiClient.dll file, by leveraging a tool such as JustDecompile. Another one would be to to simply run the cmdlets with the –Verbose/-Debug switch and hope that sufficient information is present within the diagnostic output and supplement it with whatever data can be extracted from the cmdlet help. Unfortunately, this isn’t the case for those cmdlets, so the last option we can use is to capture a network trace using Fiddler or similar tool, which in turn gives us the raw requests made to the service.
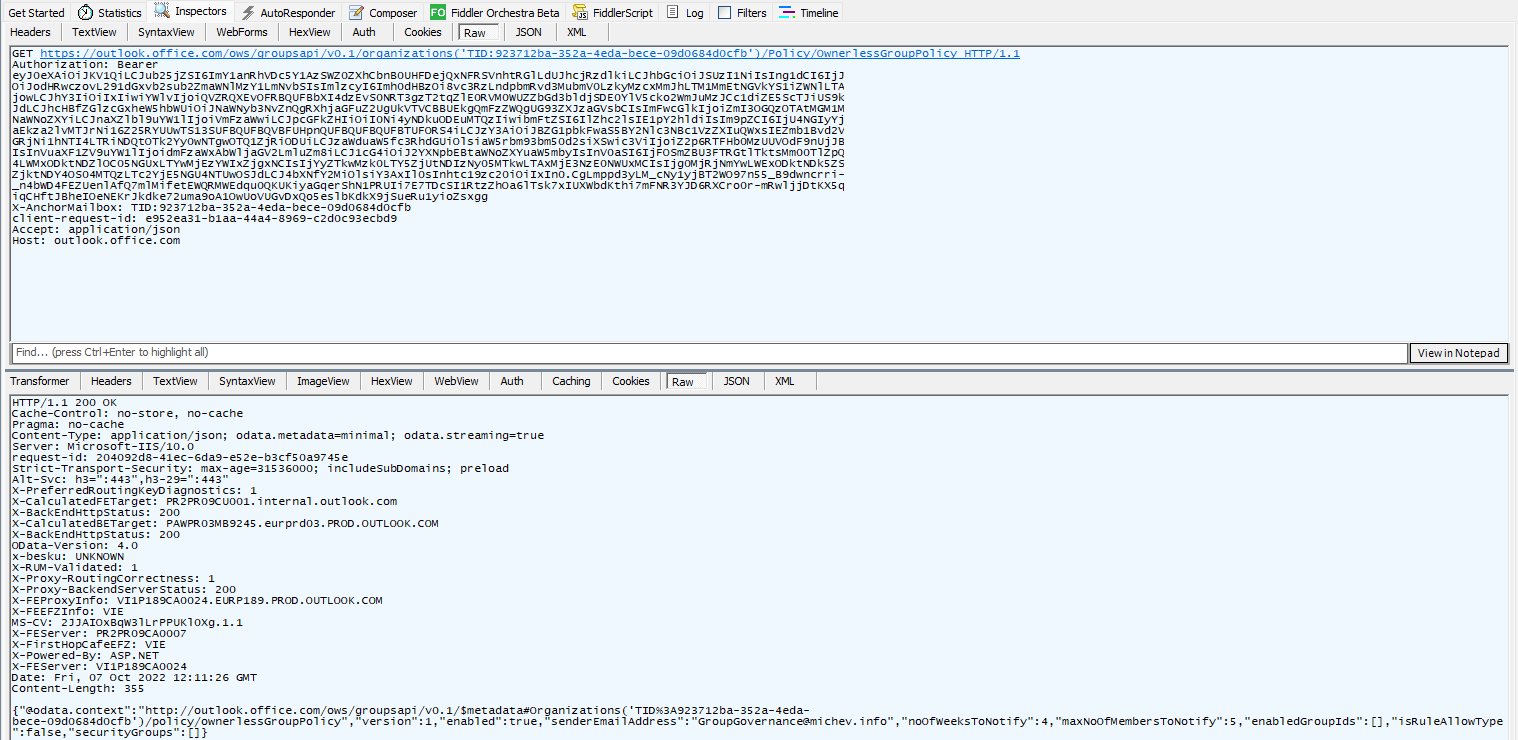
In this case, the cmdlets are wrappers for HTTPS queries against the https://outlook.office.com/ows/groupsapi/v0.1/ endpoint (“Speedway” protocol), as evident from the screenshot below, showcasing the Fiddler trace. The capture also reveals the authentication details, which unsurprisingly is the same access token the ExO PowerShell module uses for establishing the Remote PowerShell session and/or running the REST-based cmdlets.
 And with that, we’re actually ready to make our first try against a potential replacement for the Get-OwnerlessGroupPolicy cmdlet. We simply need to get an access token, either for the built-in “Microsoft Exchange REST API Based Powershell” service principal (appID fb78d390-0c51-40cd-8e17-fdbfab77341b) or your own app with the required permissions. We covered the various methods to do that in detail over several articles (i.e. here), so I will keep it light here. Apart from the token, you need the URI to query, and that’s readily available out of the Fiddler trace:
https://outlook.office.com/ows/groupsapi/v0.1/organizations('TID:923712ba-352a-4eda-bece-09d0684d0cfb')/Policy/OwnerlessGroupPolicy
 As you can see, the URI includes the tenant identifier, so you might want to pass this as a variable instead of hardcoding it. Or you can just get it as part of the token response, in our case $authenticationResult.Result.TenandId. The other interesting part is the endpoint, which uses the outlook.office.com namespace. The /ows/groupsapi/v0.1 part can be hardcoded, as it’s the same across all Office 365 customers, but if you want to be thorough and obtain it programmatically, you can do so via an AutoDiscover V2 request:
GET https://autodiscover-s.outlook.com/autodiscover/autodiscover.json?Email=user@domain.com&Protocol=Speedway

{"Protocol":"Speedway","Url":"https://outlook.office.com/ows/groupsapi/v0.1/"}
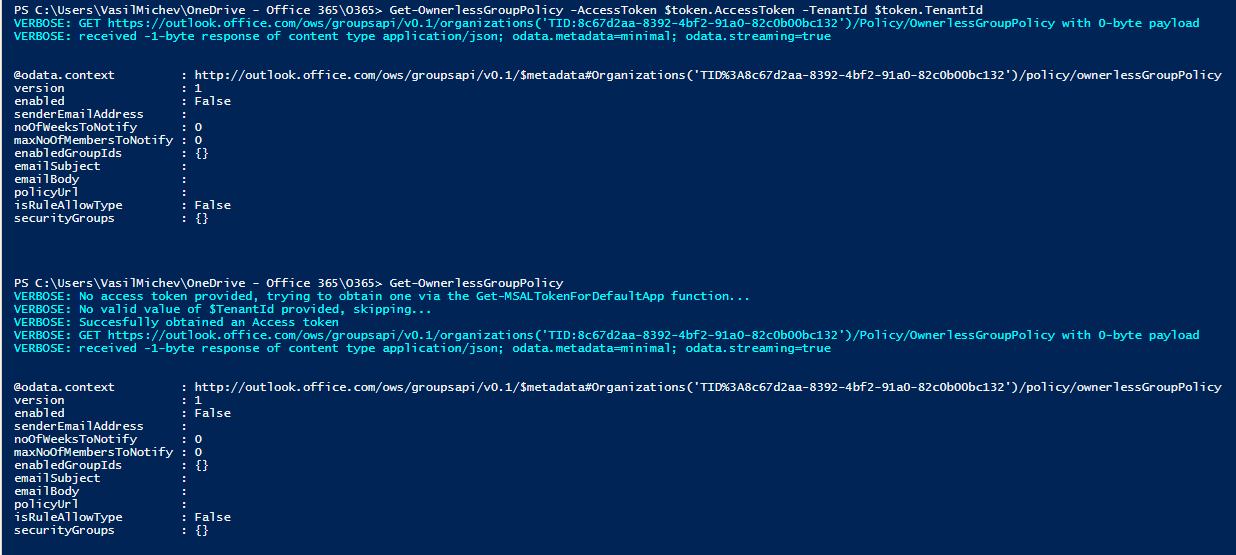
Let’s turn to the output now. As you can see on the screenshot above, the GET request we issued against the /Policy/OwnerlessGroupPolicy endpoint resulted in a JSON reply, containing details about the status of the policy (enabled property), the address from which email notifications will be sent (senderEmailAddress), the number of weeks to send notifications for (noOfWeeksToNotify), then the maximum number of members to notify (maxNoOfMembersToNotify) and the list of groups to cover (enabledGroupIds). Compared to the “real” cmdlet output (shown below), we get two “extra” properties, isRuleAllowType and securityGroups. The latter controls the list of members that can receive notifications, and the former clarifies whether members of the specified security group(s) are allowed to, or should be prevented from becoming the owner.
$res.Content | ConvertFrom-Json

@odata.context : http://outlook.office.com/ows/groupsapi/v0.1/$metadata#Organizations('TID%3A923712ba-352a-4eda-bece-09d0684d0cfb')/policy/ownerlessGroupPolicy
version : 1
enabled : True
senderEmailAddress : SiteMailbox2@michev.info
noOfWeeksToNotify : 4
maxNoOfMembersToNotify : 5
enabledGroupIds : {}
isRuleAllowType : False
securityGroups : {}
 But wait! If we go to the Microsoft 365 Admin Center UI and view/configure the Ownerless group policy therein, there are a number of other settings we can find under the Subject and message tab. So what’s up with that? Turns out, the API is coded in a way so that unless said settings have been modified, the corresponding properties are not returned. If you do make a change, they will be returned however, as shown in the below example:
$res.Content | ConvertFrom-Json

@odata.context : http://outlook.office.com/ows/groupsapi/v0.1/$metadata#Organizations('TID%3A8c67d2aa-8392-4bf2-91a0-82c0b00bc132')/policy/ownerlessGroupPolicy
version : 1
enabled : True
senderEmailAddress : admin@M365x60680951.onmicrosoft.com
noOfWeeksToNotify : 4
maxNoOfMembersToNotify : 5
enabledGroupIds : {}
emailSubject : Need your help with $Group.Name group
emailBody : Hi $User.DisplayName,

It is I, your beloved admin!

You're receiving this email because you've been an active member of the $Group.Name group. This group currently does not have an owner.

Per your organization's policy, the group requires an owner.
policyUrl :
isRuleAllowType : False
securityGroups : {}
It’s a strange approach, as it requires you to know about the existence of said settings beforehand, a real chicken and egg scenario. The list of Subject and message settings includes: the subject of the email (emailSubject), the body text (emailBody) and an optional URL for your policy guidelines (policyUrl). You cannot however tinker with the actionable message part of the email, nor the disclaimer. Once you know the corresponding setting names, you can of course make changes in a direct request too. And whenever you get a response that omits said settings, you have to assume that they are using their default values.
The Get-OwnerlessGroupPolicy cmdlet
Armed with the knowledge above, we are now ready to create our own implementation of the Ownerless group policy cmdlets. The Get- cmdlet is of course much easier to implement, but we still need to cater to the authentication bits. And since we’re dealing with an undocumented API endpoint, it’s best to choose the safe route and mimic the behavior of the built-in cmdlet. By that, I mean use the default Microsoft Exchange REST API Based Powershell app (with id fb78d390-0c51-40cd-8e17-fdbfab77341b), and delegate permissions. It might be possible to use a custom app, but we have no way of actually granting the AdminApi.AccessAsUser.All, FfoPowerShell.AccessAsUser.All and/or RemotePowerShell.AccessAsUser.All scopes used by the default app, nor any idea which one is needed. The Exchange.Manage scope which we can assign for delegate scenarios is not sufficient, and neither is the Exchange.ManageAsApp one for application permission scenarios. In other words, we cannot use the API with CBA, it seems.
So, we end up using the default app, and to make things a bit easier leverage the MSAL library to obtain a token, by means of the simple Get-MSALTokenForDefaultApp function. As with all my other script samples, do make sure to replace the authentication bits with your preferred method. Or just pass the access token directly – the cmdlets themselves have an –AccessToken parameter and they don’t care about the means you obtained it. If no access token parameter is provided, the cmdlets will try to invoke the Get-MSALTokenForDefaultApp function, but that will not always work, as it depends on the presence of (an outdated version of) the MSAL binaries. If you are passing the token, do make sure to also pass a valid (!) value for the –TenantId parameter. As I haven’t went through the trouble of decoding the provided token, there is no way for the cmdlets to know which tenant value to use otherwise!
Below are examples of how you can run the Get-OwnerlessGroupPolicy and the type of output if generates:
#Provide your own token:
Get-OwnerlessGroupPolicy -AccessToken $token.AccessToken -TenantId $token.TenantId

#Try to obtain a token via the Get-MSALTokenForDefaultApp cmdlet instead:
Get-OwnerlessGroupPolicy
The Set-OwnerlessGroupPolicy cmdlet
Next, the Set-OwnerlessGroupPolicy cmdlet can be used to make changes to the policy. While the process only differs in issuing a POST request instead of a GET one and providing a simple payload, the function itself is a lot more complicated, due to all the checks around various parameters. To minimize confusion, the parameters are named exactly as the elements of the policy object we reviewed above. For the sake of completeness, here they are again, in a list form:
- AccessToken – provide an access token, optional.
- TenantId – specify the ID of the tenant for which to set the policy, optional.
- Enabled – set the state of the policy. Optional, but inherits a default $true value. Do note that specifying a $false value will result in clearing the values of all other policy parameters. This is done service-side, so don’t blame me 🙂
- SenderEmailAddress – the address from which to send the email notifications. Required when enabling the policy. Must be a valid recipient in the tenant.
- NoOfWeeksToNotify – the number of weeks to send notifications for. Default value is 4, allowed values range from 1 to 7 weeks. Required when enabling the policy.
- MaxNoOfMembersToNotify – the maximum number of members to send notifications to. Default value is 5, allowed values range from 1 to 90. Required when enabling the policy.
- EnabledGroupIds – the list of groups to enable the policy for. Specify a null value/empty array to reset the policy to cover All groups. Specify individual groups by GUID, email address or any other property resolvable via the Get-Recipient cmdlet.
- SecurityGroups – optional parameter used to restrict the list of users that can be assigned as owners. Single group can be specified, and it must be security-enabled one. Specify a null value/empty array to reset the policy to cover All groups members. Must be used together with the IsRuleAllowType parameter.
- IsRuleAllowType – specify whether members of the group specified via the SecurityGroups parameter should be allowed to, or excluded from owner assignments. Must be used together with the SecurityGroups parameter.
- EmailSubject – optional parameter to specify the notification email subject.
- EmailBody – optional parameter to specify the notification email body. You can pass a here string for multi-line body, or use `n as needed.
- PolicyUrl – optional parameter to specify the policy guidelines URL.
That was the easy part, now let’s talk some more about parameter validation. As with the Get-OwnerlessGroupPolicy cmdlet, we don’t validate the access token, so if you decide to provide one, make sure it has the correct audience, permissions and tenant ID value that matches the value you provide for the –TenantId parameter. If no token is provided, an attempt to obtain one will be made.
Next, we build the JSON payload with the policy settings. When enabling or modifying the policy, three parameters are mandatory: SenderEmailAddress, NoOfWeeksToNotify and MaxNoOfMembersToNotify. The last two have default values that you can leverage, and as far as the SenderEmailAddress is concerned, we can try to leverage the user whose access token we’re using, if no value is provided. We can also leverage the fact that the Exchange /adminApi endpoint uses the exact same permissions you’ll find in our access token, thus we can run a call against it to verify whether the provided value matches a valid recipient in the tenant. This in turn allows us to use a range of identifiers for the SenderEmailAddress value, such as GUID, email address, alias and more.
We can apply the same trick against any value provided for the EnabledGroupIds parameter. Additional care should be taken to not override the policy behavior, as passing an empty value for said parameter will reset the behavior to include All Groups within the tenant. If you do want to reset the value, pass an empty array – @(). One interesting bit to note here – the cmdlet definition within the ExO V2 module had a limit on the maximum number of groups you can include in the policy. The current version of the API however accepts values above said limit, so I’ve not imposed any restrictions on it.
The last point of interest revolves around the “restrict who can be owner” functionality, paywalled behind the Azure AD Premium requirement. To control this, you need to provide a value for (single) security group via the SecurityGroups parameter, members of which will either be prevented from ever becoming an owner or the selection will be restricted to just them, depending on the value of the IsRuleAllowType parameter. Do note that the group must be security-enabled, so “traditional” DGs do not qualify, nor do Microsoft 365 Groups by default. Since the ExO /adminApi endpoints do not cover Azure AD security groups, we cannot verify the value provided here, unless we want to double the script size. Also, only a single group can be designated, despite the plural designation in the parameter name.
And should you decide to disable the policy, none of the validations above are relevant, as setting Enabled to $false automatically clears them service-side. One last check is then made before running the POST request with the prepared JSON payload. A successful execution will result in the updated policy settings being displayed int he console output.
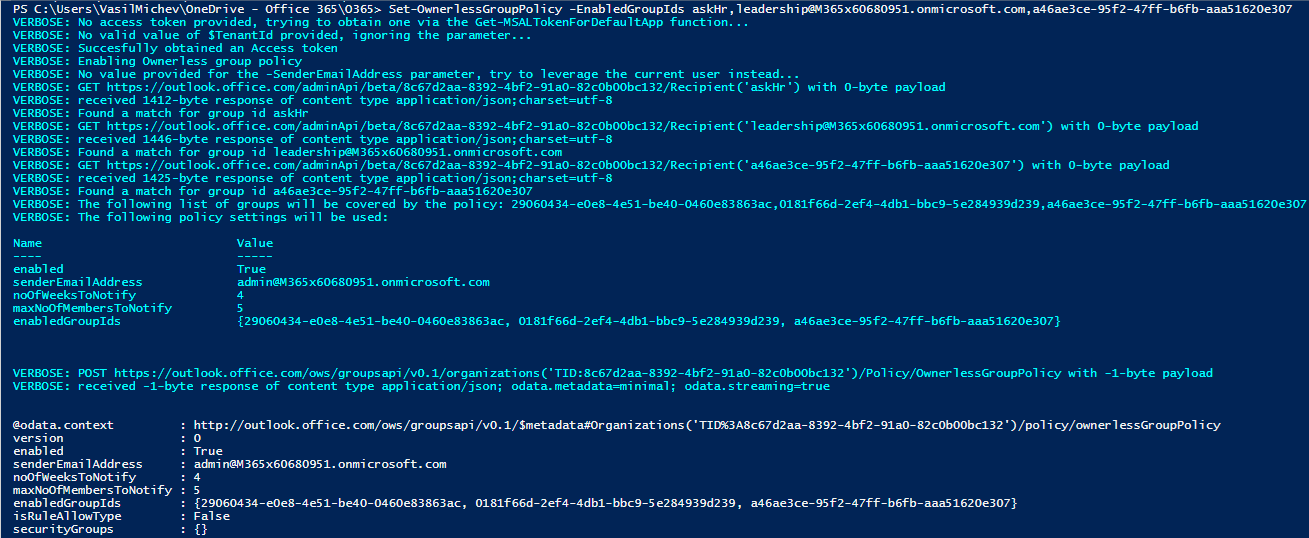
Here are some examples on how to run the Set-OwnerlessGroupPolicy cmdlet. Passing no parameters means the Ownerless group policy will be enabled with the default values, and you will be prompted to authenticate first. Alternatively, you can pass an access token and tenant ID values to the same effect. However, in the latter scenario we cannot determine the caller ID, so we have no suitable value to use for the senderEmailAddress parameter and the cmdlet will fail.
#This will prompt you for credentials and enable the policy
C:\> Set-OwnerlessGroupPolicy

#Same as above
C:\> Set-OwnerlessGroupPolicy -Enabled $true

#Pass an access token and tenant ID
#This will fail because we cannot determine the senderEmailAddress
C:\> Set-OwnerlessGroupPolicy -AccessToken $token.AccessToken -TenantId $token.TenantId

#Make sure to pass a senderEmailAddress value too:
C:\> Set-OwnerlessGroupPolicy -AccessToken $token.AccessToken -TenantId $token.TenantId -SenderEmailAddress lidiaH

#Enable the policy for specific groups only
#You can use GUID, email address or alias to designate the group
C:\> Set-OwnerlessGroupPolicy -EnabledGroupIds askHr,leadership@M365x60680951.onmicrosoft.com,a46ae3ce-95f2-47ff-b6fb-aaa51620e307

#To disable the policy, set -Enabled to $false
C:\> Set-OwnerlessGroupPolicy -Enabled $false
Finally, here’s a link to the script over at my GitHub repo. Again, do make sure to update the authentication function, as it has been coded for my convenience, and not for generic use – you will likely end up facing errors if you try to run it as is. Replace it with your preferred method to obtain a token, or just pass the token directly to the corresponding function.


