After the lengthy overview of the different types of extensions we can add to the Azure AD schema, let us finally introduce Azure AD Custom Security Attributes. In a nutshell, Custom Security Attributes are key-value pairs that you define in Azure AD and correspondingly assign to objects in order to store custom data. Custom security attributes are designed to address most of the shortcomings of the existing Azure AD schema extension mechanisms we discussed previously, including discoverability, security, and overall usability across Microsoft 365 and Azure services.
The list of resource types that support custom security attributes currently includes users, service principals and managed identities (for Azure), with plans underway to support groups, applications, devices and more. This might seem like a step backwards when comparing to some of the methods we discussed previously, but keep in mind that this functionality is still in Preview. Moreover, Microsoft has hinted that Custom Security Attributes will be the preferred schema extension method going forward, and this is the feature they intend to continue investing in.
Another point worth mentioning is that custom security attributes support data validation, in the form of predefined values you can configure for selection. Free-form values are also supported of course, and when it comes to data types the current list includes bool, integer and string. A maximum of 64 characters (bytes) is supported for each value, which is fairly limited compared to the “standard” 256 chars limit for other methods. On the positive side of things, the various limits and known issues are properly documented, unlike the situation for the Graph-based extensions, where you’re left figuring out the limits on your own.
Few words on permissions
Working with custom security attributes requires a separate set of permissions, and by default no one can create, view, update or manage them and their values. This applies to users holding the Global administrator role as well. Thus, before starting to work with custom security attributes, we are required to assign the corresponding permissions. We will cover the permissions model in more detail later, for now let’s briefly mention the Graph API permissions, which we will need for the examples in the coming section.
When using the Graph API, managing custom security attributes will require the CustomSecAttributeDefinition.ReadWrite.All scope, which is supported for both delegate and application permissions. Custom security attribute assignment on the other hand will require the CustomSecAttributeAssignment.ReadWrite.All scope. Read-only scopes were unavailable when the feature launched in public preview, but were added in early February.
For the reminder of our introduction to custom security attributes, we will be focusing mostly on programmatic access via the Graph API. Which is not to say that this is the only (or preferred) method to work with them. In fact, Microsoft has already provided the corresponding UI bits within the Azure AD blade. The operations therein are covered in detail in the official documentation, so there is no point reiterating the same content and we will instead use the corresponding Graph API endpoints. Since our examples will be leveraging the Graph explorer tool and thus require the use of delegate permissions, the user you have logged in will need to have the Attribute definition administrator role assigned.
Creating an attribute set
Now that we have some generic understanding of what Custom Security Attributes are, let’s see how we can put them in use. First, we will need to create an attribute set, which is basically a container for custom security attributes. As such, an attribute set object only requires a name and description to be created, and an (optional) property to designate the maximum number of attribute definitions allowed in the set. A total of 500 attribute sets can exist in the tenant, and each of them can host one or more custom security attributes. This container-based model is what allows us to granularly delegate permissions.
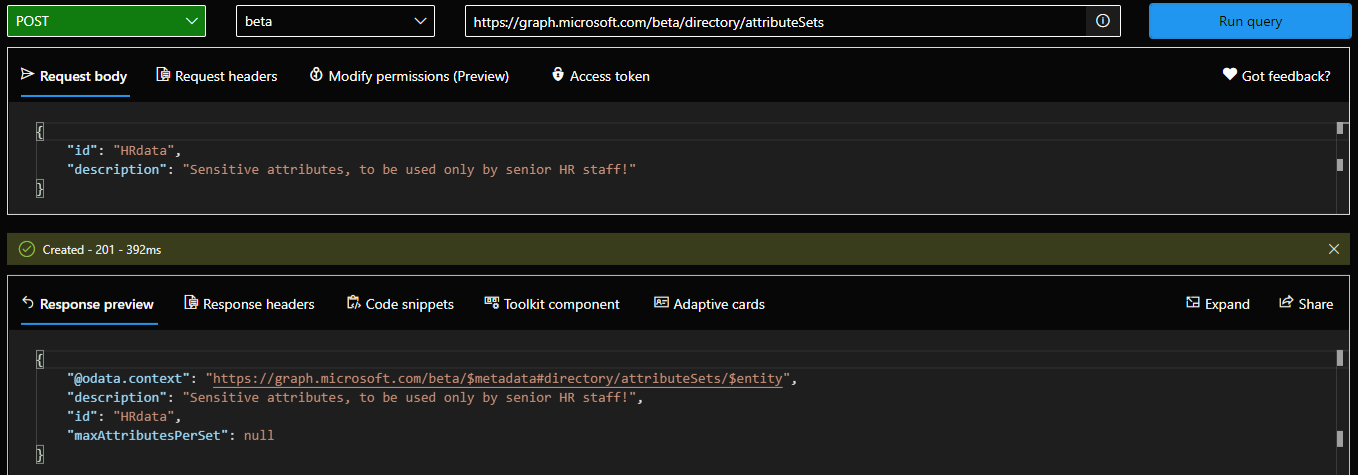
Once permissions have been taken care of, you can proceed to creating your first attribute set. Let’s call this one “HRdata” (no spaces allowed unfortunately) and put a proper description on it. The maxAttributesPerSet can optionally be provided to specify the number of attributes we can add to the set, but as mentioned above this is optional. If you do not specify a value for it, the set will allow for up to 500 attributes to be added (as per the tenant maximum). Once we have the JSON payload prepared, we can issue a POST request against the /directory/attributeSets endpoint:
POST https://graph.microsoft.com/beta/directory/attributeSets
 Here is probably a good place to mention that the feature has licensing requirements, and they are actually enforced in code. Thus, you need to make sure that your organization has an Azure AD Premium P1 or equivalent license before starting, otherwise the example above will throw an error. If you do have the necessary license, creation of the attribute set should succeed, and we can now query the same endpoint with a GET request to list all attribute sets within the organization.
Creating Custom Security Attributes
Next, we can proceed to creating the actual custom security attribute(s), or a “definition” to be more precise. Few mandatory properties need to be provided, starting with the name of the attribute. No naming schema restrictions are enforced, apart from making sure that the name of the attribute is unique within the given attribute set. Speaking of which, custom security attributes can only exist within a set, so the next mandatory property is the attributeSet name.
You need to also specify the type (boolean, integer, or string), and its status (available or deprecated). Depending on the attribute type, you can also specify whether multiple values are allowed, via the isCollection property. You can enforce data validation on the attribute values via the usePreDefinedValuesOnly property. Lastly, you can also specify whether attribute values should be indexed, via the isSearchable property. All the above are mandatory. An optional description can also be provided, and is highly recommended.
A word of warning is due here. As we cannot currently delete custom security attribute definitions, make sure to double- and triple- check things. If you make a mistake, you will not be able to reuse the same attribute name, and you will either have to choose a different name or create a new attribute set altogether. Spend some time gathering requirements and ensuring the needs of all involved parties will be met, a good plan can save you a lot of trouble latter on!
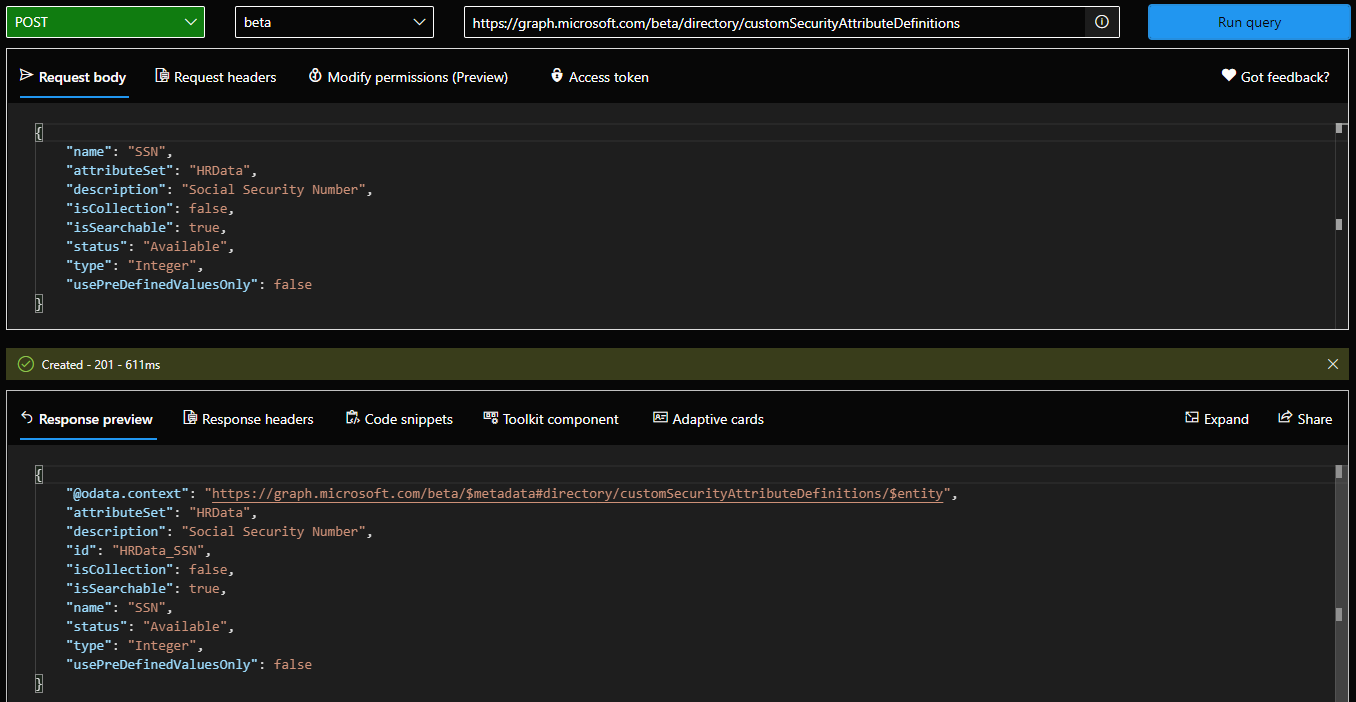
With the above information at hand, we can prepare and issue a POST request against the /directory/customSecurityAttributeDefinitions endpoint in order to create our first custom security attribute. Let’s call this one “SSN” and set the data type to integer, single value, and add it to our existing “HRdata” set:
 We can now query the directory for any and all custom attribute definitions, by issuing a GET request against the /directory/customSecurityAttributeDefinitions endpoint. To list all the attributes for a given set, you can use the $filter operator, as follows:
GET https://graph.microsoft.com/beta/directory/customSecurityAttributeDefinitions?$filter=attributeSet eq 'HRData'
You might have also noticed that the id property of our newly created attribute is prefixed with the set name, “HRData_SSN”. This ensures the uniqueness of the attribute within the directory, and is something to keep in mind when querying for attribute definitions.
Defining accepted values
In some cases, an attribute needs to only allow for specific values to be entered, out of a predefined list. For example, an attribute that designates the pay grade for a user, or a multi-valued one that lists all projects the user is working on. Apart from toggling the usePreDefinedValuesOnly flag when creating the attribute definition, you will need to also provide a list of accepted values, which is where the allowedValues property comes in play.
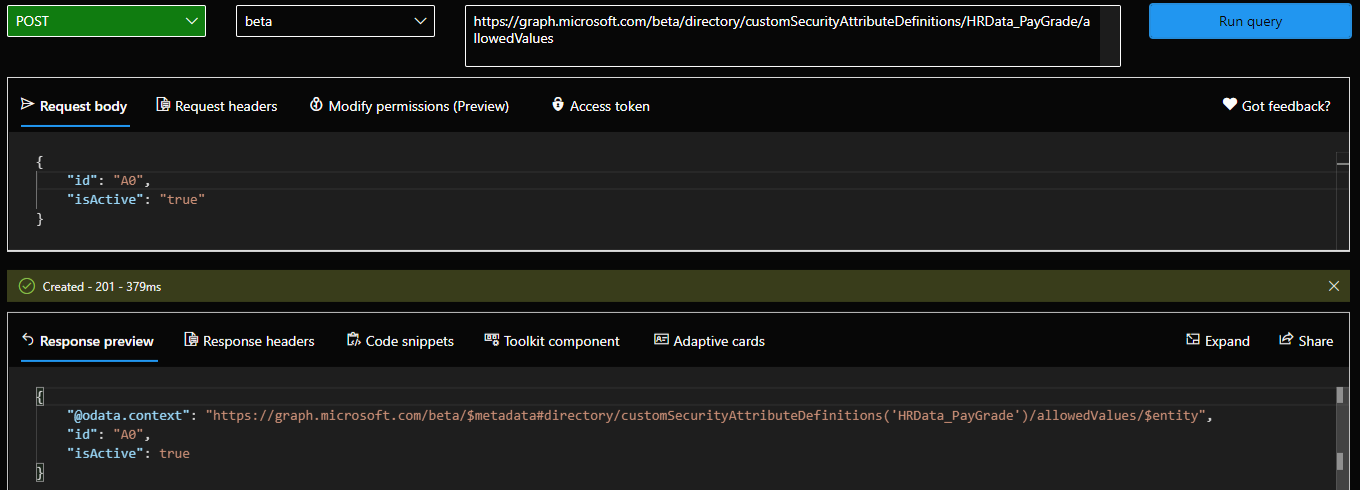
To create a new allowed value for a given attribute definition, issue a POST request against the /customSecurityAttributeDefinitions/{id}/allowedValues endpoint, and provide a JSON payload with the id of the value. Do note that the id is case-sensitive, cannot include spaces and most importantly, cannot be changed later. And, as you can probably guess by this point, a delete operation is also not supported. This in turn means that if you make a mistake, your only option is to deactivate a given value, by toggling the isActive flag (required as part of the JSON payload), or start with a new attribute altogether.
 The screenshot above illustrates how adding a new allowed value looks like, and of course you can also perform this operation via the Azure AD UI. To query all allowed values for a given attribute, issue the corresponding GET request. A PATCH request is also supported, but as mentioned above, the only property you can update is the isActive one.
That concludes the second article in our series, in the next one we will cover assigning attribute values, delegating permissions in a granular manner, audit trails and more. Finally, we will present a comparison between custom security attributes and “older” methods.
Next, in Part 3, we cover some additional scenarios. Lastly, in part 4, we will compare Custom Security Attributes against the “older” methods we introduced in the initial article.
3 thoughts on “Custom security attributes in Azure AD part 2: what are custom security attributes”