For decades now, admins have been using Organizational Units to conveniently organize the objects in their on-premises Active directory. It’s a common scenario to have all the users, groups and computers from a particular office, city or country placed in their own OU, which is then used as a single management unit. Used as the building blocks of your organizational hierarchy, OUs greatly simplify some of the management tasks in AD, ensure policy enforcement via GPOs and enable granular rights delegation.
OUs in Office 365
When a company starts using Office 365, the option exists to synchronize their on-premises AD with the cloud-based Azure Active Directory. In Azure AD however, no notion of OUs exists and instead a “flat hierarchy” is used. Even though some of the individual Office 365 workloads, such as Exchange Online or SharePoint Online have their own AD instances at the backend, which in turn have their own OU hierarchy, we as customers have no way of modifying that hierarchy by say creating a new OU. Indeed, if one uses the Get-OrganizationalUnit cmdlet in Exchange Online, a glimpse at the underlying OU structure is exposed:
Thus, for each Office 365 tenant a single OU exists in ExODS, with another one hosting any soft-deleted objects. No cmdlets are exposed for creating or removing OUs however, so customers that are used to organize their processes around grouping users in OUs need to find a different solution. Most commonly, some of the custom attributes is used as a workaround, or a security group is created to host all relevant users in its membership.
Another option is to use the so-called Administrative units, which we covered in our recent webinar (you can get the recording here). Although AUs can be useful in some scenarios, there are many limitations you need to work with, perhaps the most important one being that they are in no way related to on-premises OUs.
Syncing OU information to Office 365
So we now know that no OUs exist in Office 365 and some workarounds or third-party products are used instead to organize user objects and delegate management on them. Even though we cannot directly leverage OUs, in some situations it is important to know which on-premises OU a given object belongs to. Based on customers feedback, back in June 2017 Microsoft released an update to the Azure Active Directory Connect tool that includes schema updates allowing the sync of the DistinguishedName on-premises attribute to Azure AD, with the corresponding attribute known as OnPremisesDistinguishedName.
Generally speaking, all you need to do in order to get this information flowing to Azure AD is to install a recent version of AAD Connect (1.1.553.0 or above). There is no need to enable anything on either on-premises or Office 365 side. Organizations that have limited the set of attributes syncing to Azure AD or are modifying the default sync rules should make sure that the customizations in question are not interfering.
Once you have a recent version of AAD Connect installed, you can start leveraging OU information via Azure AD. Even though the OnPremisesDistinguishedName attribute is not exposed directly in any of the admin interfaces, you can query for its value via Azure AD PowerShell or the Graph API. This in turn allows us to extract the information about the OU (or container) in which the user object resides on-premises, along with any “parent” OUs. Here’s an example on how to do this via the Get-AzureADUser cmdlet:
(Get-AzureADUser -SearchString dan | select -ExpandProperty ExtensionProperty)["onPremisesDistinguishedName"]

CN=Dan,OU=Cogmotive,DC=michev,DC=info
OK, let’s break this down. We used the Get-AzureADUser cmdlet to find a user named “dan”, then get the value of an attribute called ExtensionProperty. This attribute is actually a hash table, containing several key/value pairs. Ignoring all the rest, we query the “OnPremisesDistinguishedName” key and display the corresponding value. Now all that’s left is to remove everything left of the first comma, which in turn will give us the distinguishedName of the OU.
If the user is moved to a different OU on-premises, the corresponding value of the distinguishedName attribute will be updated, and after a sync cycle, so will the value of the OnPremisesDistinguishedName attribute. Of course, where possible you should get this information directly from the on-premises AD, as some sync issue might be preventing Azure AD from displaying up to date values.
Reporting on OU information for all users
Now that we know where to get the OU information from, how do we go about reporting it across all Office 365 users? The first task is to get the list of users, more specifically the list of synchronized users as only those will have the OU information populated. To get the list, we can use the following filter when running the Get-AzureADUser cmdlet:
Get-AzureADUser -All:$true -Filter "DirSyncEnabled eq true"
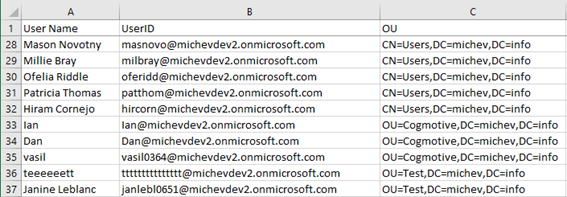
Once we have the list, we simply need to iterate over each user and reconstruct the OU information, just like in the example we used above. The beauty of PowerShell is that all this can be automated with just a few lines of code, and we have provided a sample script for the task over at the TechNet Gallery. The script will connect to Azure AD, get the list of synced users, get the OU information and output it to a CSV file, along with the display name and UserPrincipalName attributes. Here’s an example output:
As usual, feel free to modify the script as you see fit, or leave comments and feedback on any issues you find with it.


Thank you so much for this script. It really saved my day. Keep up the good work.
Brilliant, worked a treat! This is a very underrated script!
Because MS decided in their wisdom to mess with GitHub and broke all the links, I can’t find the script at https://gallery.technet.microsoft.com/Azure-AD-report-on-user-OU-eff7d7c3 Do you have another link?
Whoops, seems I forgot to update the link on this article, thanks for noticing 🙂
https://github.com/michevnew/PowerShell/blob/master/OU_report.ps1