One of the very few benefits of not being able to attend Ignite is to quickly check on any new features announced there, while sitting comfortably in front of your PC. Earlier today at Ignite, a new preview for the next server version of Windows was announced. I took the opportunity to download the ISO from MSDN and spin up a new VM for it while listening to the Keynote. Just as Joe Belfiore finished his demo-intensive presentation, my new toy was already up and running.
The first thing you will notice during setup, is that the GUI install option is gone. You can choose between either “true” Core or Core “with local admin tools”. If you want the GUI, you need to enable it post install. If you install the GUI, without the Desktop Experience, you will get the new start menu sans the modern app bits. You do get the virtual desktops and Task View. There are some gotchas as well, for example the simple task of right-clicking the desktop in order to change the resolution will greet you with the lovely “You’ll need a new app to open this ms-setting”. Eugh, modern apps!
Here’s a quick list of all the new roles/features before we focus on the important one – AD FS. In no particular order:
Host Guardian Service HostGuardianServiceRole
Host Guardian Hyper-V Support HostGuardian
Setup and Boot Event Collection Setup-and-Boot-Event…
VM Shielding Tools for Fabric Management FabricShieldedTools
Windows Server Antimalware Features Windows-Server-Antim…
And in case you missed the important announcements from the keynote, we also have Nano Server (plus Containers coming in the next preview), Windows Update for Business and the best one: advanced threat analytics! For the cloud people – Microsoft Azure Services that will further close the gap between the Public and Private cloud offerings based on MS technology. I’m sure more will come from Ignite, and other official and unofficial sources!
Anyway, what’s new in AD FS? The install process is pretty much the same. The GUI tools are also the same (you still use the MMC console that is). What about in the PowerShell module? A lot! For starters, the number of cmdlets available for the AD FS module for PowerShell is now… wait for it… 143!
PS C:\> Get-Command -Module ADFS | measure

Count : 143
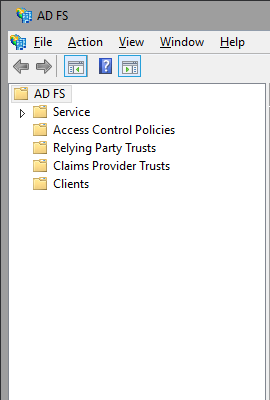
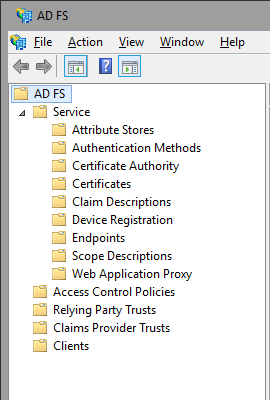
Let’s take a quick look in the order they appear in the MMC console. There are 5 nodes now, with the Service Node getting the most child items – all the ‘server-side’ configuration has been moved there. This is the central point for configuring new or existing Attribute Stores (remember that you are no longer limited to Windows AD!)
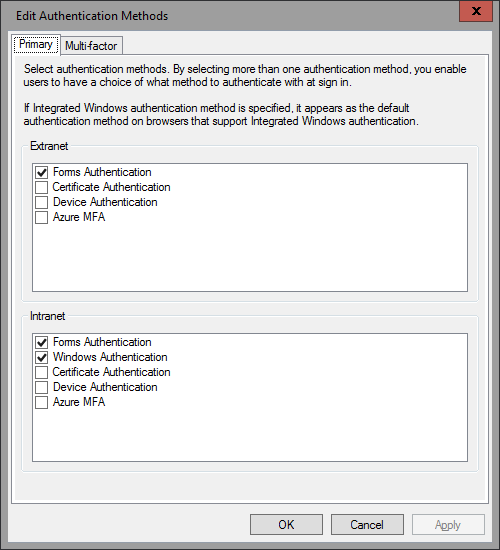
The Authentication methods node has been moved here as well, and while it offers pretty much the same options as before, you can find out some new and exciting methods listed there:
Azure MFA comes built-in now, and is available as both Primary and Multi-factor authentication method! You might have noticed that the per-RPT authentication policies section is now missing. It has been incorporated in the new Access Control Policies, which we will cover a bit later. You can also enforce additional authentication methods via the Set-AdfsRelyingPartyTrust cmdlet if needed. Sadly, no option to configure a specific MFA provider for RPT, it’s all or nothing still.
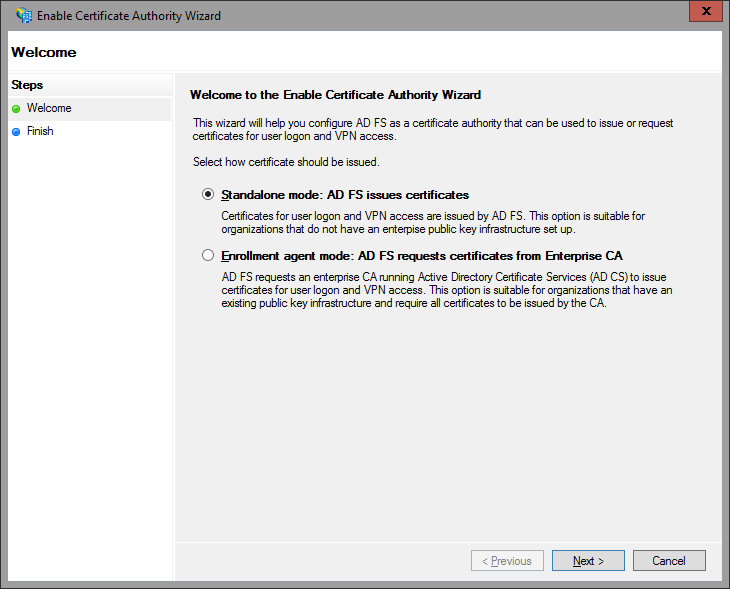
The next subnode allows you to configure the AD FS server as a certificate authority or connect it with an existing AD CA. With ease! All it takes is few clicks:
Deactivating the feature takes a single click as well, and in case you are interested, the corresponding PowerShell cmdlets are Get/Set/Disable-AdfsCertificateAuthority.
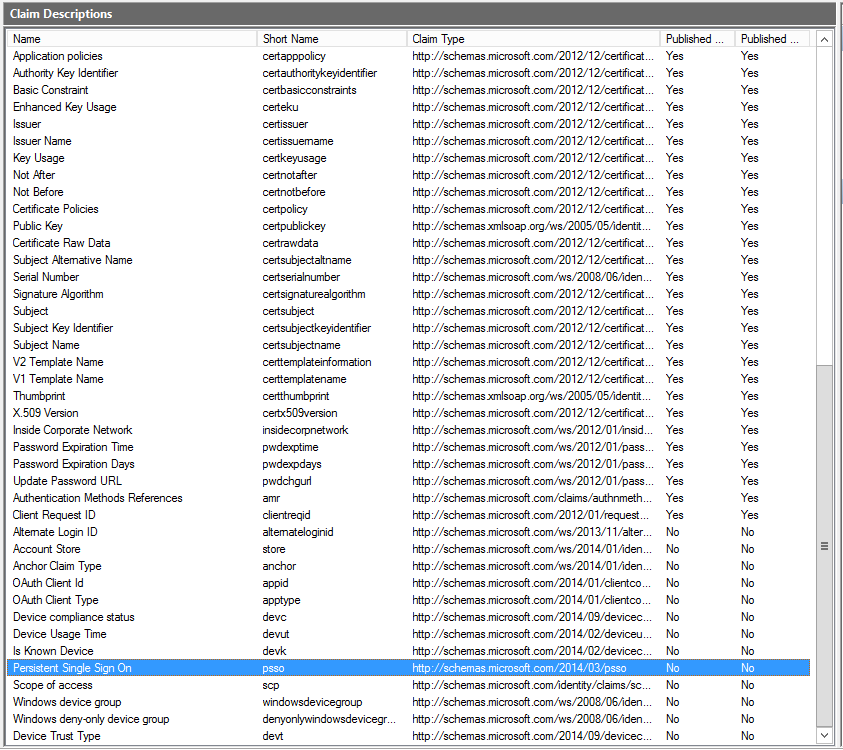
The Certificates node is pretty much the same, as is the Claims Descriptions one. There are a LOT of new claims however, with the total number increased to 77! PowerShell support yay!
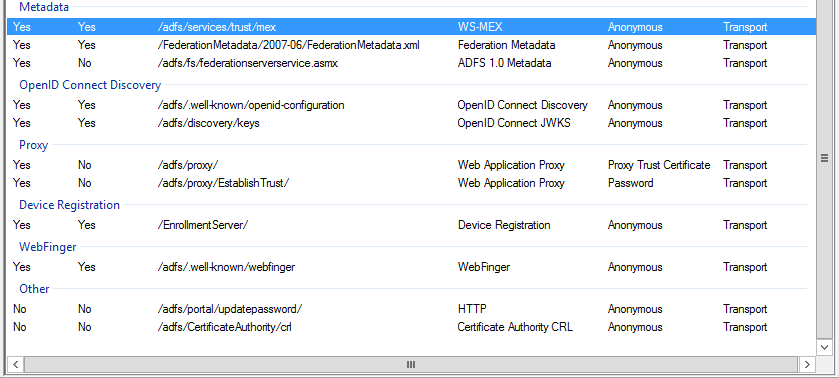
Device Registration configuration has also been simplified, but we have seen this one already in the previous TP version of Windows Server. The Endpoints configuration has not changed as well, but the number of endpoints has jumped to 59. They give you some hints of what is coming – OpenID, WAP proxy, WebFinger all built-in. Plus options to enable password change and CRL checks.
Scope descriptions allow you to limit the access for OAuth clients on per RPT basis. You can create/edit scope descriptions via both PowerShell and the MMC console, however I wasn’t able to find a way of assigning/removing a scope from a particular RPT via PowerShell. So I decided I don’t like this feature!
The last node is the “Web application proxy” one and will be used to take a quick overview of the status of any WAPs you have in place. With this, we conclude the brief overview of “server-side” configuration node. The rest of the nodes allow you to configure ‘client-side’ stuff, such as RPTs and CPTs, OAuth clients and the Access Control Policies. Let’s start with the latter.
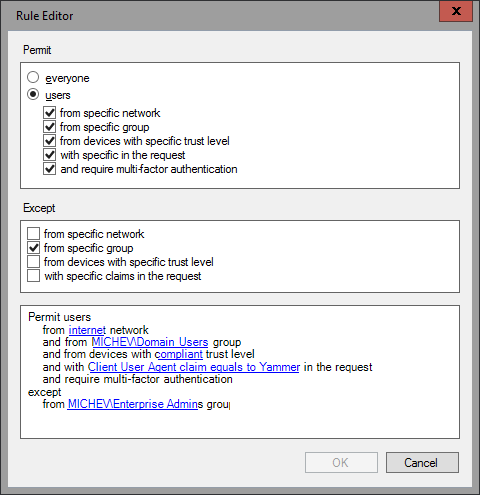
Access control policies are just the familiar claims rules, with a makeover. They were called Policy templates in the previous preview version, and have been renamed again. You can easily configure and control access to a particular RPT by selecting one of the predefined ACPs or creating a new one, all from the new and improved GUI dialog:
What was previously done only via the cryptic claims rule syntax in the text-based UI controls is now a matter of a simple click. Remember when you had to type in the Group SID? It’s all done by selecting it from the familiar AD controls now. On the backend, it’s all PowerShell of course. And it’s all IssuanceAuthorizationRules, with or without enforcing the option to RequireFreshAuthentication. The policy settings are written in XML format which you can examine by looking at the PolicyMetadata parameter. It also includes a summary of the settings, as reading an XML file is not really something convenient:
PS C:\> (Get-AdfsAccessControlPolicy -Name New).PolicyMetadata | fl *
Now, if you are using one of the default ACPs, it will actually allow you to pass parameters to it when assigning to specific RPT. So they can pretty much be used as templates (as they were called previously), and by adjusting the parameters for each RPT you can reuse them as needed. For newly created ACPs via the GUI however, providing a value for all parameters is required. Luckily, PowerShell doesn’t suffer from such limitations and you can use the New-AdfsAccessControlPolicy cmdlet to work around it, so you end up creating a template instead.
If you want to get a list of all the default ACPs, you can use the following cmdlet:
PS C:\> Get-AdfsAccessControlPolicy | ? {$_.IsBuiltIn -eq "True"} | ft Name,Description

Name Description
---- -----------
Permit everyone and require MFA for specific group Grant access to everyone and require MFA for users of one or more specified groups.
Permit everyone and require MFA Grant access to everyone and require MFA for everyone.
Permit everyone and require MFA from unauthenticated devices Grant access to everyone and require MFA from unauthenticated devices.
Permit everyone for intranet access Grant access to the intranet users.
Permit everyone and require MFA from extranet access Grant access to the intranet users and require MFA for the extranet users.
Permit specific group Grant access to users of one or more specified groups.
Permit everyone Grant access to everyone.
Each of those default ACPs and any new ones you create can be assigned to one or more or the RPTs you have configured. This can be done via the GUI, where we have a new menu/right-click option, or via PowerShell and the Get-AdfsRelyingPartyTrust cmdlet. The relevant parameters are AccessControlPolicyName and AccessControlPolicyParameters, where the latter specifies the parameters passed to the general ACP template.
The next node is the Relying Party Trusts one, which has changed a little. Instead of having two separate menu items for creating either a new claims aware RPT or non-claims aware one, the GUI wizard will now ask you that information on the first step. The rest is pretty much the same, with the MFA configuration replaced by the Access Control Policy and a new option to support OAuth in the GUI. Other than that, the process is pretty much the same. Once you have created the RPT, you can edit the claims rules and/or the ACPs in pretty much the same fashion as before (well obviously the ACP dialog is new). The RPT Properties dialog reveals a new tab for the OAuth Client Permissions, where you can add/edit OAuth clients and their associated scopes. The Proxy Endpoints tab is also new (or at least I don’t remember seeing it before).
The Claims Provider Trusts node hasn’t changed it seems, so let’s skip it. The last node is the Clients one, corresponding to OAuth clients. An OAuth client is simply the application that will be accessing information about the user account. OAuth clients can be either public or confidential ones, with the later requiring authentication. These are the built-in ones:
PS C:\> Get-AdfsClient | ? {$_.BuiltIn -eq $true}| ft Name,Description,ClientId

Name Description ClientId
---- ----------- --------
Windows Server Work Folders Client Client for syncing user files to a Work Folders sync share 168f3ee4-63fc-4723-a61a-6473f6cb515c
Microsoft Windows VPN client Client for Microsoft Windows VPN 3FC694FE-0FC9-4D02-8932-1072AC58DBF7
Device Registration Client Client for the Device Registration Service dd762716-544d-4aeb-a526-687b73838a22
Token Broker Client Client for Microsoft Windows Token Broker aad:brokerplugin
You can use one of the built-in clients, or create new a new one. You cannot remove or edit any of the default clients, either via the GUI or PowerShell. Each of the OAuth clients can be assigned to any claims-aware RPT, along with one or multiple scopes, which allows you a granular control.
One thing you might notice if you decide to test the newly installed federation server is that the IdP initiated logon page is now not allowing logon by default. Navigating to https://sts.domain.com/adfs/ls/idpinitiatedsignon.asp will load the page, but any attempt to logon will result in an IdPInitiatedSignonPageDisabledException error. If you are used to testing things with the page you can enable it via PowerShell. And while you are at it, enable the Relay state parameter as well:
PS C:\> Set-AdfsProperties -EnableRelayStateForIdpInitiatedSignOn $true -EnableIdPInitiatedSignonPage $true
And yes, those are controlled via PowerShell now if you have missed the news from the last preview, put a stop to the editing of config files!
Lastly, note that the Azure MFA provider is NOT configured by default (you can quickly verify this via Get-AdfsAzureMfaConfigured). Unfortunately, there is no documentation available on that yet and the Set-AdfsAzureMfaTenant/New-AdfsAzureMfaTenantCertificate cmdlets don’t offer any examples as well. So I will get back to that once there is some more information available, but if you want to fake it for now, just use “Set-AdfsAzureMfaTenant -TenantId a” or whatever J
UPDATE: There is a great session from Ignite 2015 covering AD FS vNext, make sure to watch it. Here are some highlights: AD FS vNext servers will be able to join to existing 2012R2 farms, ACPs create from the MMC console can accept parameters if you leave the parameter (for example group ID) empty, the ability to use custom claims types with ACPs, improvements in permissions required to run/configure AD FS, lots of info about OAuth and OpenID Connect, per-RPT branding, using Device authentication as primary (how did I miss that, it’s clearly shown in the settings!), support for time-limited group membership (connected with the JIT/JEA functionalities in AD vNext). So cool!
https://channel9.msdn.com/Events/Ignite/2015/BRK3871/

1 thought on “What’s new in Windows 10 Server Technical Preview 2 for the Office 365 IT Pro (AD FS vNext)”